
There’s something undeniably magical about the way a simple cup of hot chocolate can warm your heart and bring people closer on a chilly evening. Over the years, I’ve played with twists on this classic comfort drink, but nothing quite captures the joy and surprise like these Cupid’s Cocoa Bombs. Inspired by my childhood memories of cozy coastal nights spent around the dinner table, these little spheres of chocolate and flavor are more than just a treat—they’re an invitation to share, to connect, and to savor a moment of sweetness together. I still remember the first time I tried making a cocoa bomb at home after one of Eli’s bedtime stories, and how Maya and I marveled at the way it melted perfectly into steaming milk. If you love chocolate and want a fun way to bring a little extra warmth to your day, you’re in for a real treat.
Table of Contents
Why You’ll Love This Cupid’s Cocoa Bombs
Looking back, my early kitchen experiments—like the infamous oversalted chili when I was twelve—taught me that balance and creativity can turn any mishap into something wonderful. Cupid’s Cocoa Bombs are a perfect example of that spirit. They’re not only visually charming but also a delightful way to customize your hot chocolate experience. Whether you’re a beginner or a seasoned home cook, these bombs are approachable, forgiving, and guaranteed to impress your family or friends without stressing you out.
What I love most is how these cocoa bombs bring a little theater to an ordinary cup of cocoa. Watching the chocolate shell melt and release its hidden treasures feels like a small celebration—something I always try to keep alive in my kitchen. Plus, they’re incredibly versatile. You can tweak the fillings, use dairy or plant-based milk, and even add a splash of your favorite liqueur for grown-up gatherings.
From my Wednesday dinners in college to family moments with Eli and Maya, food has always been about connection and comfort. Cupid’s Cocoa Bombs carry that tradition forward, creating a cozy experience that’s as much about the ritual as the flavor.
Ingredients You’ll Need for This Cupid’s Cocoa Bombs
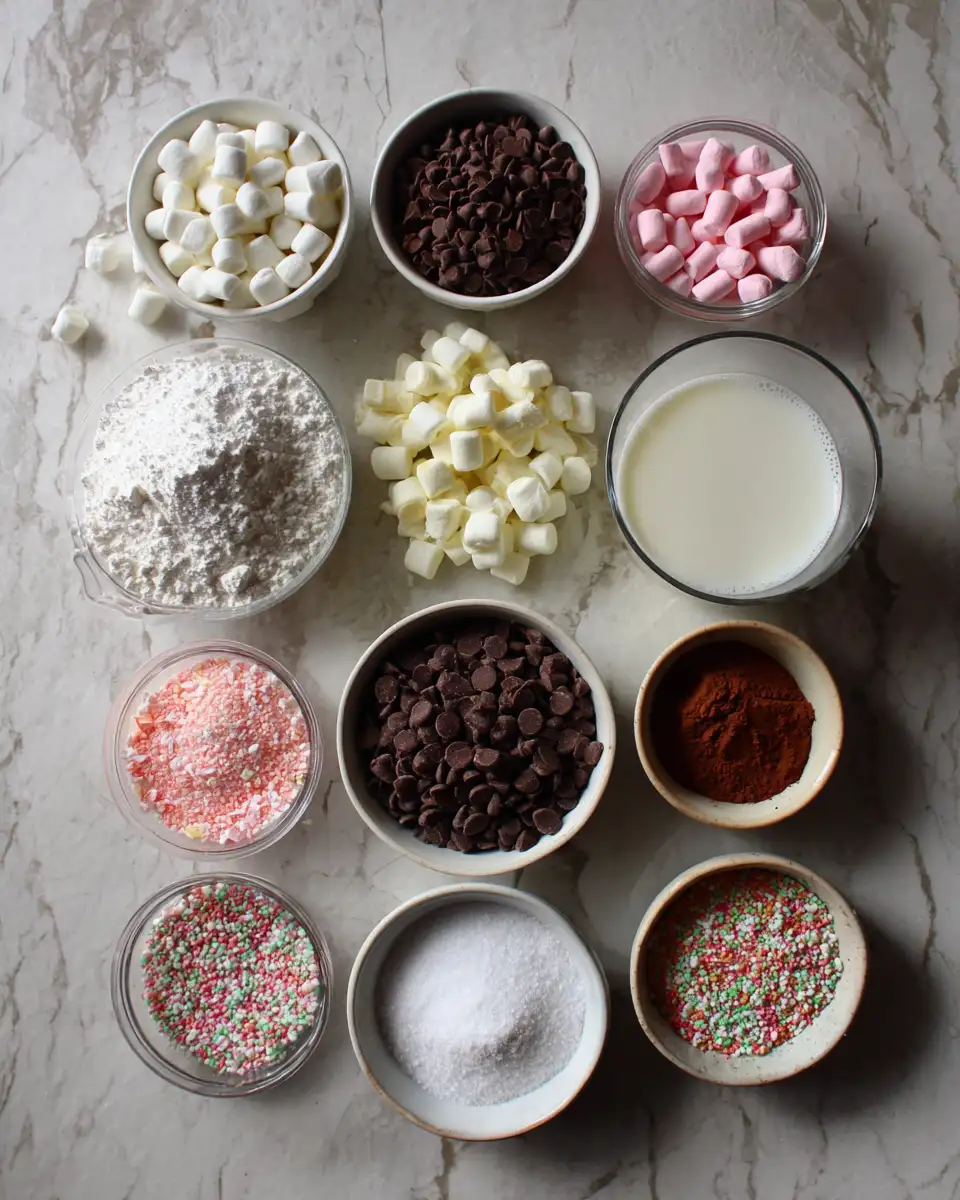
- 8 ounces high-quality semi-sweet or dark chocolate, chopped (or chocolate chips)
- 1/2 cup mini marshmallows
- 2 tablespoons hot cocoa mix (choose your favorite blend)
- 1 teaspoon powdered sugar (optional, for dusting)
- 1/4 teaspoon cinnamon (optional, adds warmth and depth)
- 1 teaspoon vanilla extract (optional, adds a subtle roundness)
- Extra chocolate for sealing the bombs (about 2 ounces)
Substitution tips: If you want to keep things dairy-free, choose a dairy-free chocolate and use coconut or almond milk when serving. For a fun twist, swap the mini marshmallows for crushed peppermint candies or add a pinch of chili powder to the cocoa mix for a hint of spice.
Nutrition Facts
- Calories: Approximately 210 per cocoa bomb
- Protein: 2g
- Fat: 12g (mostly from chocolate)
- Carbohydrates: 25g
- Fiber: 3g
- Sugar: 20g
- Sodium: 35mg
These numbers reflect a single cocoa bomb without milk. Keep portions in mind when serving, especially if you’re sharing with kids like Eli—who’s surprisingly picky but gives these a thumbs-up every time.
Print
Cupid’s Cocoa Bombs The Ultimate Sweet Treat for Romance
- Total Time: 45 minutes
- Yield: 4 servings 1x
Description
Learn how to make delicious Cupid’s Cocoa Bombs. Easy recipe with step-by-step instructions.
Ingredients
- 8 ounces high-quality semi-sweet or dark chocolate, chopped (or chocolate chips)
- 1/2 cup mini marshmallows
- 2 tablespoons hot cocoa mix (choose your favorite blend)
- 1 teaspoon powdered sugar (optional, for dusting)
- 1/4 teaspoon cinnamon (optional, adds warmth and depth)
- 1 teaspoon vanilla extract (optional, adds a subtle roundness)
- Extra chocolate for sealing the bombs (about 2 ounces)
Substitution tips: If you want to keep things dairy-free, choose a dairy-free chocolate and use coconut or almond milk when serving. For a fun twist, swap the mini marshmallows for crushed peppermint candies or add a pinch of chili powder to the cocoa mix for a hint of spice.
Instructions
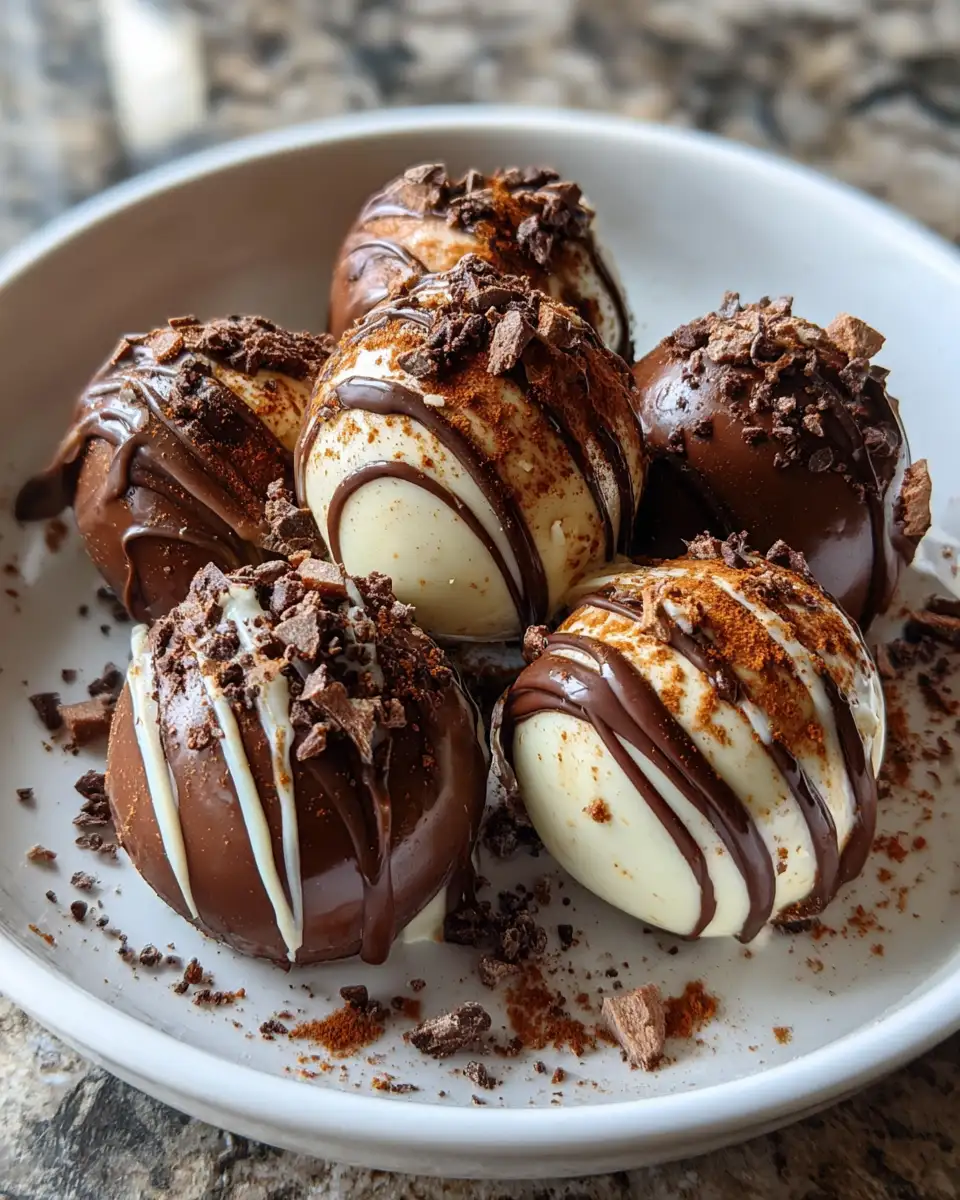
- Start by melting the 8 ounces of chocolate gently in a double boiler or microwave. If using a microwave, heat in 30-second bursts, stirring in between to avoid overheating and seizing. The chocolate should be smooth and glossy.
- Using a silicone half-sphere mold (about 2 inches in diameter), spoon about a tablespoon of melted chocolate into each cavity. Tilt the mold to coat the sides evenly, making sure to build a thick enough shell to hold the fillings without breaking. Chill in the fridge for about 10 minutes to set.
- Once the first layer is firm, add a second thin layer of chocolate for extra strength. Chill again for 10 minutes.
- Carefully remove the chocolate halves from the mold. Here’s a tip I learned the hard way: if they don’t release easily, give them a little extra time to chill or gently warm the mold with your hands to loosen.
- Fill half of the spheres with 1 teaspoon of hot cocoa mix and a small handful of mini marshmallows. You can sprinkle a pinch of cinnamon or a few drops of vanilla extract inside for added flavor.
- Warm the extra chocolate (2 ounces) slightly to use as “glue.” Take an empty half-sphere and dip the rim briefly into the melted chocolate, then quickly press it onto a filled half to seal. Hold gently until set.
- Place the sealed cocoa bombs back in the fridge for 15 minutes to harden completely.
- To enjoy, heat a mug of milk (about 8 ounces) until steaming but not boiling. Drop in one cocoa bomb and watch it melt, stirring gently to combine the melted chocolate, cocoa mix, and marshmallows into a creamy, dreamy cup of hot chocolate.
From experience, I recommend having a towel handy—the melting chocolate can get a little messy, but that’s part of the fun!
- Prep Time: 15 minutes
- Cook Time: 30 minutes
- Category: Main Dish
- Method: Cooking
- Cuisine: International
Keywords: Cupid's Cocoa Bombs, recipe, cooking, food
Steps to Create Your Cupid’s Cocoa Bombs
- Start by melting the 8 ounces of chocolate gently in a double boiler or microwave. If using a microwave, heat in 30-second bursts, stirring in between to avoid overheating and seizing. The chocolate should be smooth and glossy.
- Using a silicone half-sphere mold (about 2 inches in diameter), spoon about a tablespoon of melted chocolate into each cavity. Tilt the mold to coat the sides evenly, making sure to build a thick enough shell to hold the fillings without breaking. Chill in the fridge for about 10 minutes to set.
- Once the first layer is firm, add a second thin layer of chocolate for extra strength. Chill again for 10 minutes.
- Carefully remove the chocolate halves from the mold. Here’s a tip I learned the hard way: if they don’t release easily, give them a little extra time to chill or gently warm the mold with your hands to loosen.
- Fill half of the spheres with 1 teaspoon of hot cocoa mix and a small handful of mini marshmallows. You can sprinkle a pinch of cinnamon or a few drops of vanilla extract inside for added flavor.
- Warm the extra chocolate (2 ounces) slightly to use as “glue.” Take an empty half-sphere and dip the rim briefly into the melted chocolate, then quickly press it onto a filled half to seal. Hold gently until set.
- Place the sealed cocoa bombs back in the fridge for 15 minutes to harden completely.
- To enjoy, heat a mug of milk (about 8 ounces) until steaming but not boiling. Drop in one cocoa bomb and watch it melt, stirring gently to combine the melted chocolate, cocoa mix, and marshmallows into a creamy, dreamy cup of hot chocolate.
From experience, I recommend having a towel handy—the melting chocolate can get a little messy, but that’s part of the fun! Learn more: The Ultimate Guide to Baking the Perfect Classic Pecan Pie
Tips for Making the Best Cupid’s Cocoa Bombs
When I first started making these at home, my biggest challenge was getting the chocolate shell just right. Too thin and it cracks; too thick and it feels heavy. My trick? Patience and chilling in stages. Trust me, that extra time in the fridge makes all the difference, especially if you’re like me and cooking after a busy day with a toddler underfoot.
Another tip: use good quality chocolate. It doesn’t have to be fancy—just something you enjoy eating on its own. The flavor and smoothness will shine through in the final cocoa bomb. Also, don’t skip the sealing step with melted chocolate; it’s what keeps everything together and prevents leaks.
If you want to get creative, try adding a surprise inside: a small piece of peppermint, a pinch of sea salt, or even a dollop of peanut butter powder. I’ve found that part of the joy is in sharing these little surprises, much like those family dinners where every dish tells a story.
Serving Suggestions and Pairings
Cupid’s Cocoa Bombs make a perfect gift or a cozy treat for a night in. Pair your hot chocolate with simple snacks like buttery shortbread cookies, toasted nuts, or a slice of banana bread—something that won’t overpower the rich, chocolatey drink. I remember serving these during one of Maya’s birthday evenings, alongside her favorite salted caramel brownies, and it was a hit with everyone.
If you’re planning a casual Valentine’s Day or a family movie night, these bombs add a touch of whimsy and warmth. For a grown-up twist, serve alongside a mug of spiked hot cocoa by adding a shot of bourbon or peppermint schnapps. Just be sure to keep a few bombs kid-friendly for Eli and his little friends.
Storage and Reheating Tips
Store your Cupid’s Cocoa Bombs in an airtight container at room temperature or in the fridge if your kitchen is warm. They can last up to two weeks, making them great for prepping ahead of time or gifting. Just avoid the freezer, as rapid temperature changes can cause the chocolate to bloom (those white streaks) and affect texture.
When reheating, always warm your milk gently on the stove or microwave, then add the cocoa bomb. Don’t try to microwave the bomb itself, as it won’t melt evenly and can create a mess. If you’re making them ahead, remind family members or guests to stir well for that perfect, creamy cup every time.
Frequently Asked Questions
What are the main ingredients for Cupid’s Cocoa Bombs?
The main ingredients for Cupid’s Cocoa Bombs include the items listed in our ingredients section above. Each ingredient plays a crucial role in achieving the perfect flavor and texture.
How long does it take to make Cupid’s Cocoa Bombs?
The total time to make Cupid’s Cocoa Bombs includes both preparation and cooking time. Check the recipe card above for exact timing details.
Can I make Cupid’s Cocoa Bombs ahead of time?
Yes, Cupid’s Cocoa Bombs can often be prepared in advance. Store it properly in an airtight container in the refrigerator and consume within the recommended timeframe.
What can I serve with Cupid’s Cocoa Bombs?
Cupid’s Cocoa Bombs pairs well with various sides and accompaniments. Consider the serving suggestions mentioned in the recipe for the best dining experience.
Is Cupid’s Cocoa Bombs suitable for special diets?
Depending on the ingredients used, Cupid’s Cocoa Bombs may be adapted for various dietary needs. Check the ingredients list and consider substitutions as needed for your dietary requirements.
Final Thoughts
Creating Cupid’s Cocoa Bombs at home brings me right back to those early days when I learned that even a kitchen mistake can open the door to new adventures. These cocoa bombs are more than just a tasty treat—they’re a way to slow down and savor the simple joys of sharing warmth and sweetness. Whether you’re making them with your kids, surprising a loved one, or just treating yourself after a long day, they remind me that food is truly about connection.
“If Eli eats it without bargaining, it earns a spot on the blog”—that’s my unofficial seal of approval, and Cupid’s Cocoa Bombs have earned it time and again.
So, grab your chocolate, invite your favorite people, and get ready to make your kitchen a little cozier. You’ve got this, and I promise, these cocoa bombs will bring smiles and comfort with every melting sip.
