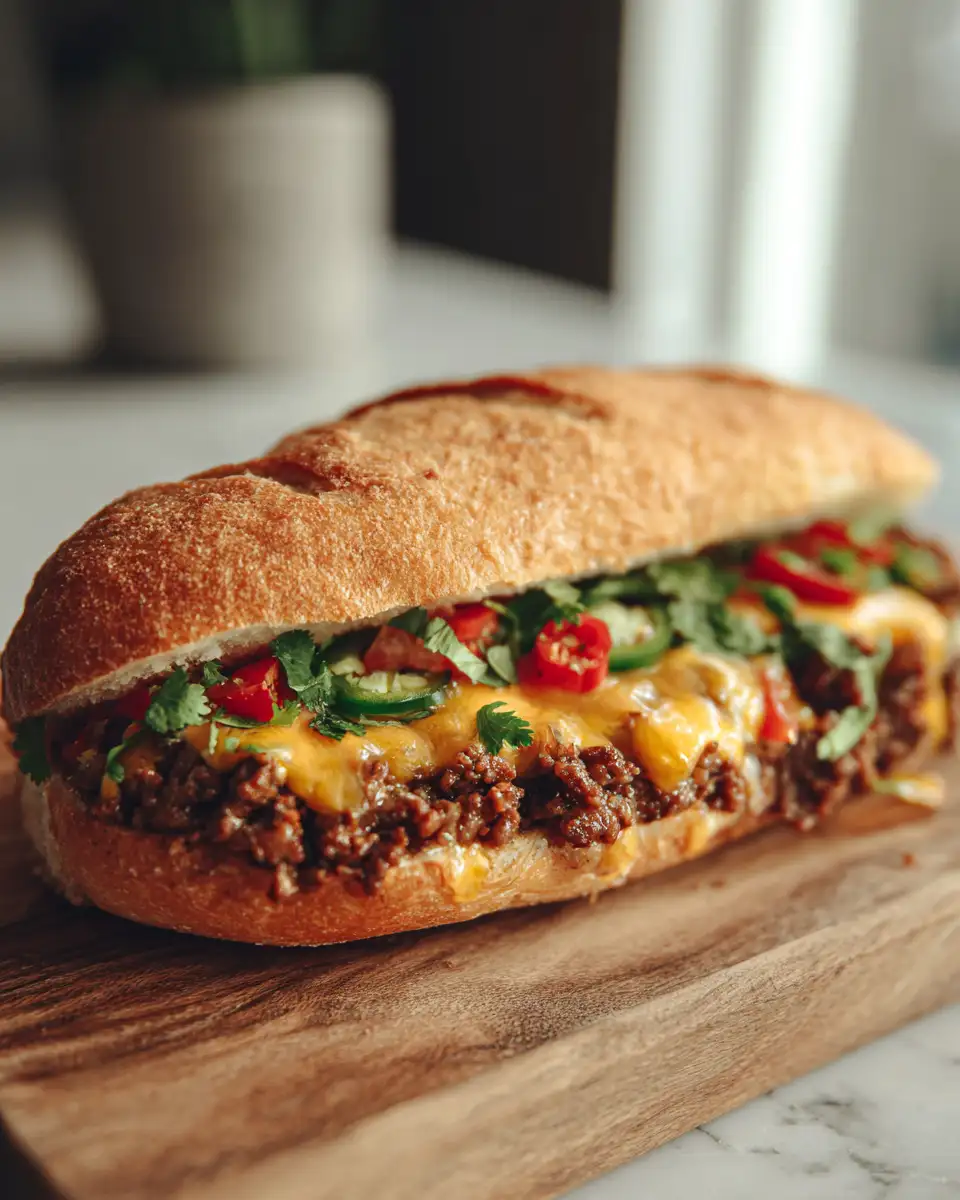
There’s something about the humble sandwich that always feels like a warm hug after a long day, and the Mexican Chopped Cheese Sandwich has quickly become one of my family’s favorite comfort foods. Growing up in that small coastal town, meals were more than just food—they were about connection, stretching simple ingredients, and finding joy in the everyday. This sandwich, with its bold, savory flavors and satisfying texture, reminds me of those Wednesday dinners I used to host in college, where friends gathered around affordable, hearty meals that felt like a celebration of togetherness. If you’re looking for a sandwich that’s approachable, packed with flavor, and perfect for weeknight cooking, you’ve landed in the right place.
Table of Contents
Why You’ll Love This Mexican Chopped Cheese Sandwich
What’s not to love about a Mexican Chopped Cheese Sandwich? It’s a delicious twist on the classic New York chopped cheese, infused with vibrant Mexican spices and fresh ingredients that bring layers of flavor without complicating the process. I’ve always believed that good food doesn’t have to be fancy or expensive—this recipe proves it. It’s perfect for anyone who’s juggling family dinners or just wants a no-fuss meal that’s both satisfying and budget-friendly.
One of my earliest kitchen memories involves salvaging an oversalted chili by adjusting the beans and tomatoes until it was just right. That experience taught me the value of balance—something this sandwich delivers in spades. The combination of seasoned ground beef, melted cheese, and crisp vegetables tucked inside a soft roll creates a harmony of textures and tastes that hit all the right notes. Plus, it comes together quickly, meaning you can have a homemade, crowd-pleasing meal on the table in about 30 minutes.
Ingredients You’ll Need for This Mexican Chopped Cheese Sandwich
- 1 pound ground beef (80/20 for the best flavor and juiciness)
- 1 medium white onion, finely chopped
- 2 cloves garlic, minced
- 1 teaspoon ground cumin
- 1 teaspoon smoked paprika
- ½ teaspoon chili powder (adjust based on heat preference)
- Salt and freshly ground black pepper, to taste
- 4 hoagie rolls or sturdy sandwich buns
- 4 slices of mozzarella or Monterey Jack cheese (cheese that melts well is key)
- 1 medium tomato, diced
- 1 cup shredded iceberg lettuce (for the perfect crunch)
- Optional: sliced pickled jalapeños or fresh avocado slices
- 2 tablespoons vegetable oil or olive oil
- Fresh cilantro leaves for garnish (optional but recommended)
If you’re short on ground beef, lean ground turkey or even a plant-based beef substitute work well here. For the cheese, I’ve used both mozzarella and Monterey Jack with great results, but you can also try a mild cheddar if you prefer a sharper bite. My family likes adding pickled jalapeños for a little kick, but feel free to skip or swap in fresh jalapeño slices if you want more heat. These substitutions keep the recipe flexible, just like those Wednesday dinners I hosted years ago—making sure everyone leaves the table happy.
Nutrition Facts
- Calories: Approximately 480 per sandwich
- Protein: 28g
- Fat: 25g (mostly from beef and cheese)
- Carbohydrates: 35g
- Fiber: 3g
- Sugar: 4g (mostly from vegetables and bread)
- Sodium: 720mg (varies with added salt and cheese)
These numbers are based on realistic portions and typical store-bought ingredients. When I cook for my family, I aim for balance—not perfection—so I encourage you to focus on the joy of eating well. If you want to lighten it up, consider swapping the hoagie rolls for whole-grain or lower-carb options, or using a leaner protein. Either way, this sandwich delivers a satisfying mix of protein, fat, and carbs to keep you energized.
Print
Discover the Irresistible Flavor of the Mexican Chopped Cheese Sandwich
- Total Time: 45 minutes
- Yield: 4 servings 1x
Description
Learn how to make delicious Mexican Chopped Cheese Sandwich. Easy recipe with step-by-step instructions.
Ingredients
- 1 pound ground beef (80/20 for the best flavor and juiciness)
- 1 medium white onion, finely chopped
- 2 cloves garlic, minced
- 1 teaspoon ground cumin
- 1 teaspoon smoked paprika
- ½ teaspoon chili powder (adjust based on heat preference)
- Salt and freshly ground black pepper, to taste
- 4 hoagie rolls or sturdy sandwich buns
- 4 slices of mozzarella or Monterey Jack cheese (cheese that melts well is key)
- 1 medium tomato, diced
- 1 cup shredded iceberg lettuce (for the perfect crunch)
- Optional: sliced pickled jalapeños or fresh avocado slices
- 2 tablespoons vegetable oil or olive oil
- Fresh cilantro leaves for garnish (optional but recommended)
If you’re short on ground beef, lean ground turkey or even a plant-based beef substitute work well here. For the cheese, I’ve used both mozzarella and Monterey Jack with great results, but you can also try a mild cheddar if you prefer a sharper bite. My family likes adding pickled jalapeños for a little kick, but feel free to skip or swap in fresh jalapeño slices if you want more heat. These substitutions keep the recipe flexible, just like those Wednesday dinners I hosted years ago—making sure everyone leaves the table happy.
Instructions
- Heat the vegetable oil in a large skillet over medium-high heat until shimmering. Add the chopped onion and sauté for about 3 minutes until translucent and fragrant. This step is crucial—onions bring that sweet, savory base that carries the flavor.
- Add the minced garlic and cook for another 30 seconds, stirring constantly to avoid burning. Garlic infuses the meat with that warm, aromatic touch that makes this sandwich special.
- Add the ground beef to the skillet. Break it up with a spatula and cook for about 5 minutes until it starts to brown and no longer pink.
- Sprinkle in the cumin, smoked paprika, chili powder, salt, and pepper. Stir well to evenly distribute the spices. This is where the magic happens—these spices give the sandwich its Mexican-inspired kick.
- Continue cooking for another 3–4 minutes, letting the beef fully absorb the flavors and develop a nice sear. Taste and adjust seasoning if necessary. When I first tried this recipe, I found that a pinch more cumin made all the difference.
- Reduce the heat to low and lay the slices of cheese evenly over the meat mixture. Cover the skillet with a lid or foil and let the cheese melt, about 2–3 minutes. You want it gooey and melty, not overcooked.
- While the cheese melts, slice your hoagie rolls open but keep the bottom halves intact to hold the filling.
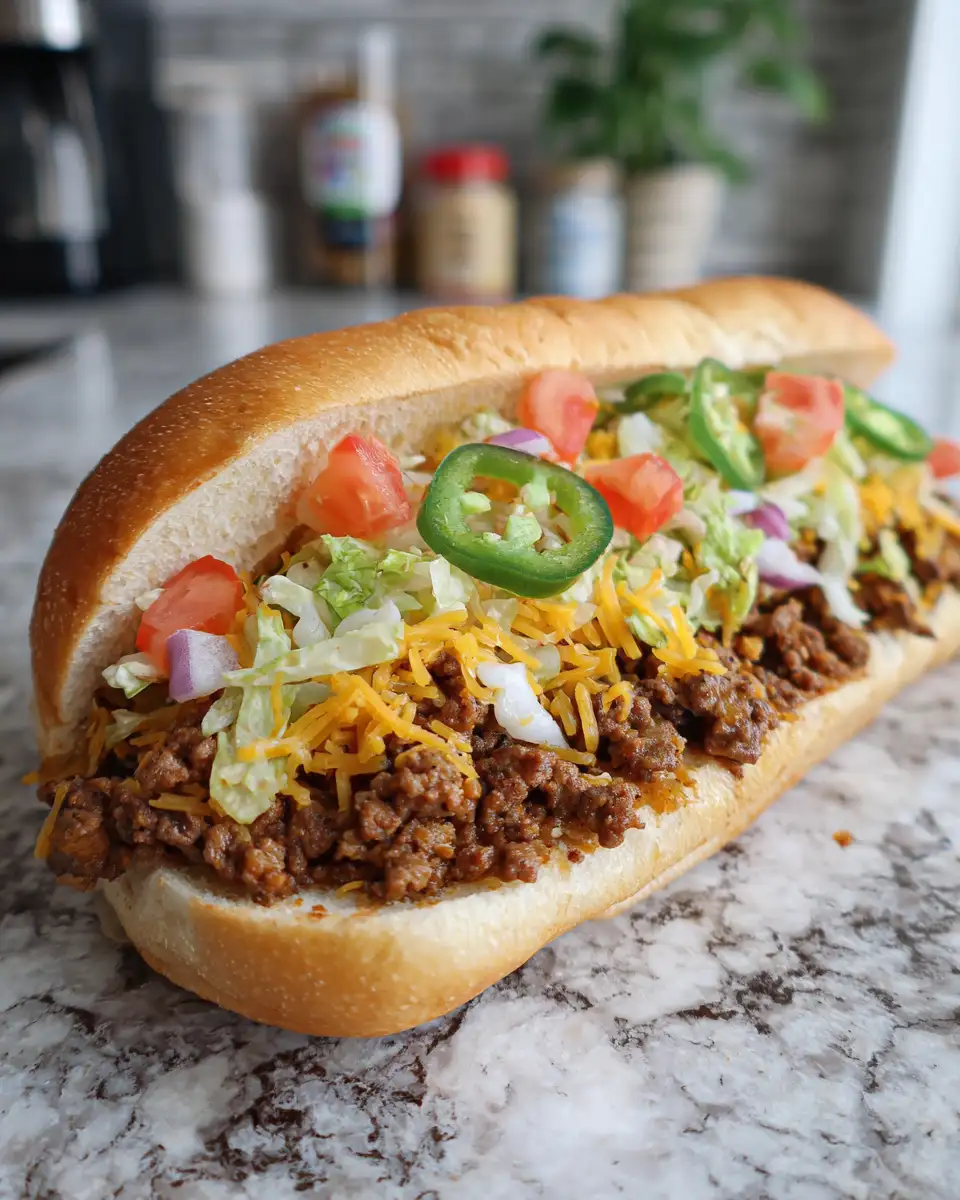
- Spoon generous portions of the cheesy beef mixture into each roll, making sure to scrape all those flavorful bits from the pan.
- Top with diced tomatoes, shredded lettuce, and optional jalapeños or avocado slices. Fresh cilantro leaves add a nice herbal brightness—Maya swears by this final touch.
- Serve immediately, ideally with a side of homemade chips or a simple salad. Eli once surprised us all by asking for seconds of this sandwich without any fuss, so trust me—it’s kid-approved too.
- Prep Time: 15 minutes
- Cook Time: 30 minutes
- Category: Main Dish
- Method: Cooking
- Cuisine: International
Keywords: Mexican Chopped Cheese Sandwich, recipe, cooking, food
Steps to Create Your Mexican Chopped Cheese Sandwich
- Heat the vegetable oil in a large skillet over medium-high heat until shimmering. Add the chopped onion and sauté for about 3 minutes until translucent and fragrant. This step is crucial—onions bring that sweet, savory base that carries the flavor.
- Add the minced garlic and cook for another 30 seconds, stirring constantly to avoid burning. Garlic infuses the meat with that warm, aromatic touch that makes this sandwich special.
- Add the ground beef to the skillet. Break it up with a spatula and cook for about 5 minutes until it starts to brown and no longer pink.
- Sprinkle in the cumin, smoked paprika, chili powder, salt, and pepper. Stir well to evenly distribute the spices. This is where the magic happens—these spices give the sandwich its Mexican-inspired kick.
- Continue cooking for another 3–4 minutes, letting the beef fully absorb the flavors and develop a nice sear. Taste and adjust seasoning if necessary. When I first tried this recipe, I found that a pinch more cumin made all the difference.
- Reduce the heat to low and lay the slices of cheese evenly over the meat mixture. Cover the skillet with a lid or foil and let the cheese melt, about 2–3 minutes. You want it gooey and melty, not overcooked.
- While the cheese melts, slice your hoagie rolls open but keep the bottom halves intact to hold the filling.
- Spoon generous portions of the cheesy beef mixture into each roll, making sure to scrape all those flavorful bits from the pan.
- Top with diced tomatoes, shredded lettuce, and optional jalapeños or avocado slices. Fresh cilantro leaves add a nice herbal brightness—Maya swears by this final touch.
- Serve immediately, ideally with a side of homemade chips or a simple salad. Eli once surprised us all by asking for seconds of this sandwich without any fuss, so trust me—it’s kid-approved too.
Tips for Making the Best Mexican Chopped Cheese Sandwich
From my years hosting friends and family, I’ve learned a few key tips to make this sandwich shine every time: Learn more: Irresistible Mini Grilled Cheese Hawaiian Rolls You Need to Try
- Don’t rush the onions: Slow-cooked onions add sweetness and depth. Rushing this step is a common mistake I made early on, and it changes the whole flavor profile.
- Use a sturdy roll: A hoagie or sub roll with some heft keeps the sandwich from becoming a soggy mess, especially with juicy fillings like this.
- Balance your seasonings: Like when I fixed that oversalted chili as a kid, taste as you go. You want enough spice to be flavorful but not overwhelming.
- Cheese choice matters: Pick a cheese that melts smoothly. Mozzarella and Monterey Jack work beautifully because they create that perfect gooey texture without overpowering the spices.
- Fresh toppings add contrast: The crisp lettuce and juicy tomato cool the rich beef and cheese. Don’t skip them—they bring a fresh crunch that completes the sandwich.
“Stretching simple pantry ingredients into comforting dishes that bring everyone to the table—that’s what cooking means to me.”
Serving Suggestions and Pairings
I like to keep things simple but satisfying when serving the Mexican Chopped Cheese Sandwich. Here are a few ideas that have worked well at my table:
- Crispy homemade tortilla chips with guacamole or salsa for dipping
- A quick side salad of mixed greens with a lime vinaigrette to brighten the meal
- Black beans seasoned with cumin and garlic, cooked in the slow cooker ahead of time
- Grilled corn on the cob, brushed with a little chili-lime butter
When I first introduced this sandwich to Maya and Eli, pairing it with fresh corn and black beans reminded me of those family dinners back home—simple, hearty, and full of love. If you want to keep it low-effort, pick up some store-bought chips and a jar of your favorite salsa. Sometimes, the easiest pairings are the best.
Storage and Reheating Tips
Leftovers? No problem. Since this sandwich is best enjoyed fresh, here’s how I handle storage and reheating at my house, especially when Eli needs a quick snack after daycare:
- Wrap leftover sandwich halves tightly in foil or plastic wrap and store in the refrigerator for up to 2 days.
- To reheat, unwrap the sandwich and place it on a baking sheet in a preheated 350°F oven for about 10 minutes. This helps maintain the crispiness of the roll and melts the cheese nicely.
- If you’re in a rush, a quick zap in the microwave works too—just be aware that the bread might get a bit soft.
- For longer storage, you can separate the beef filling and freeze it in an airtight container for up to 3 months. Thaw overnight in the fridge and reheat on the stove before assembling fresh sandwiches.
I’ve found that prepping the beef mixture ahead of time is a lifesaver on busy weeknights, letting me assemble sandwiches in just minutes when hunger strikes. Plus, it means more time to connect with Maya and Eli around the table.
Frequently Asked Questions
What are the main ingredients for Mexican Chopped Cheese Sandwich?
The main ingredients for Mexican Chopped Cheese Sandwich include the items listed in our ingredients section above. Each ingredient plays a crucial role in achieving the perfect flavor and texture.
How long does it take to make Mexican Chopped Cheese Sandwich?
The total time to make Mexican Chopped Cheese Sandwich includes both preparation and cooking time. Check the recipe card above for exact timing details.
Can I make Mexican Chopped Cheese Sandwich ahead of time?
Yes, Mexican Chopped Cheese Sandwich can often be prepared in advance. Store it properly in an airtight container in the refrigerator and consume within the recommended timeframe.
What can I serve with Mexican Chopped Cheese Sandwich?
Mexican Chopped Cheese Sandwich pairs well with various sides and accompaniments. Consider the serving suggestions mentioned in the recipe for the best dining experience.
Is Mexican Chopped Cheese Sandwich suitable for special diets?
Depending on the ingredients used, Mexican Chopped Cheese Sandwich may be adapted for various dietary needs. Check the ingredients list and consider substitutions as needed for your dietary requirements.
Final Thoughts
The Mexican Chopped Cheese Sandwich is more than just a tasty meal—it’s a reminder that great food doesn’t have to be complicated or expensive. It’s about taking simple ingredients, adding a little love and seasoning, and creating something that brings people together. Whether you’re feeding a hungry family, hosting friends on a budget, or just looking for a no-fuss weeknight dinner, this recipe delivers on all fronts.
Whenever I make this sandwich, I’m transported back to those early days of cooking experiments, family dinners, and the joy of sharing food that’s made with care. So go ahead, give it a try—you’ve got this. And if Eli’s enthusiastic thumbs-up is any indication, I promise it’ll earn a spot on your table too.