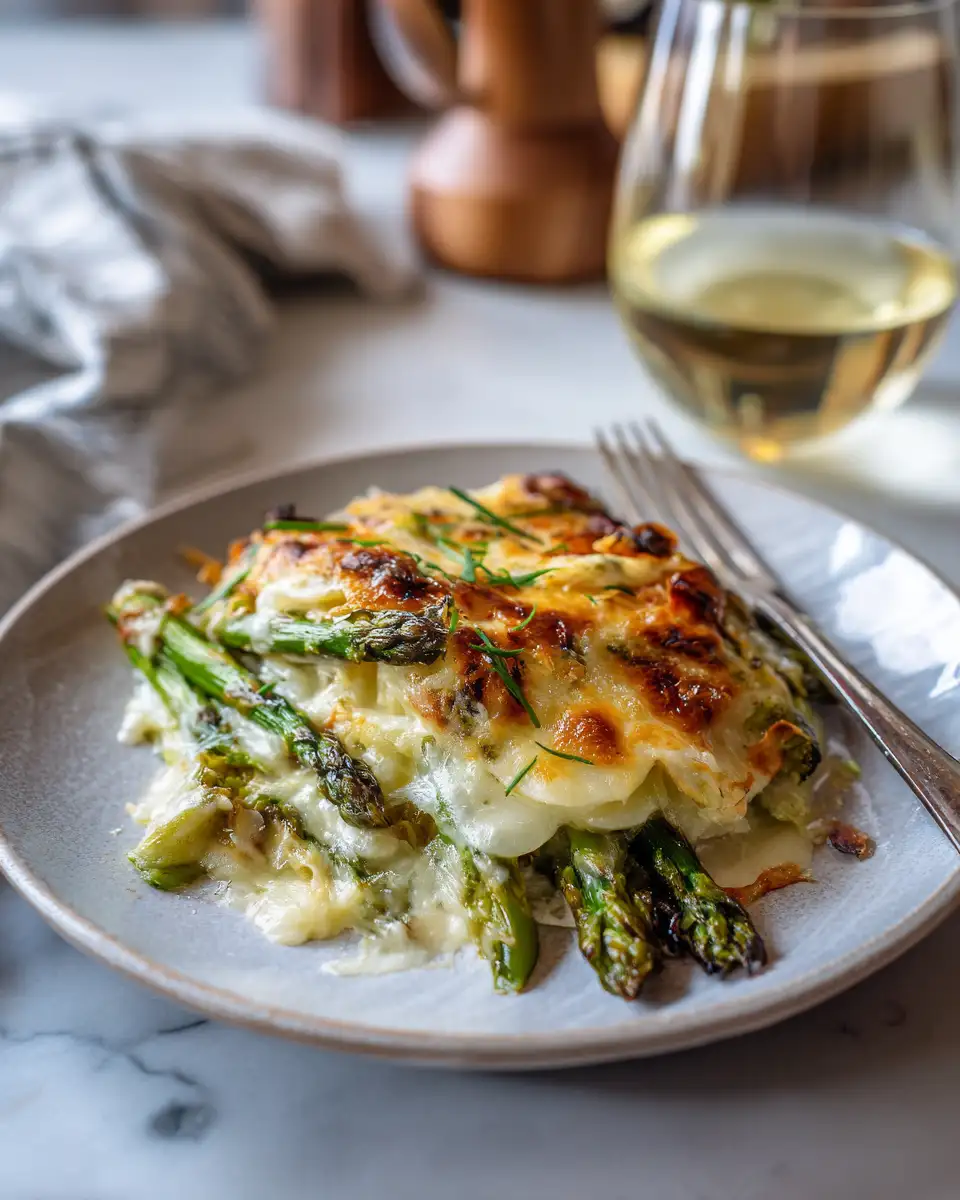
There’s something truly comforting about a dish that combines simple ingredients into something unexpectedly rich and satisfying—enter my Cheesy Asparagus Gratin. Growing up in a small coastal town, family dinners were the heart of our home, and I learned early on how to stretch humble ingredients into meals that felt like a warm hug. This gratin is one of those dishes that feels fancy enough for a holiday table but is easy enough for a weeknight dinner. It’s creamy, cheesy, and features asparagus, one of my favorite spring veggies that brings a fresh, vibrant crunch to every bite.
Table of Contents
Why You’ll Love This Cheesy Asparagus Gratin
I still remember the first time I made a gratin on my own during college, right around the time I was hosting my budget-friendly Wednesday dinners. What started as a way to impress friends without breaking the bank quickly became a kitchen staple. This Cheesy Asparagus Gratin hits all the right notes: it’s creamy, cheesy, and has that perfect golden crust, but it’s also approachable and forgiving for cooks at any level.
Asparagus can sometimes be tricky—it’s easy to overcook and lose its bright flavor. This gratin balances the tender stalks with a creamy sauce that’s light but indulgent, paired with a crispy topping that brings texture and contrast. Plus, it’s a great way to sneak some veggies onto the table in a way even my young son Eli will happily eat without negotiation. It’s a dish that turns simple ingredients into something special, just like my parents taught me back home.
Ingredients You’ll Need for This Cheesy Asparagus Gratin
- 1 ½ pounds fresh asparagus, trimmed and cut into 2-inch pieces
- 2 tablespoons unsalted butter
- 2 cloves garlic, minced
- 2 tablespoons all-purpose flour
- 1 ½ cups whole milk (or 2% for a lighter option)
- 1 cup shredded Gruyère cheese (substitute with sharp cheddar or mozzarella if preferred)
- ½ cup grated Parmesan cheese
- ½ teaspoon salt, adjust to taste
- ¼ teaspoon freshly ground black pepper
- ¼ teaspoon nutmeg, freshly grated if possible
- ½ cup panko breadcrumbs (can use crushed crackers as a substitute)
- 1 tablespoon olive oil or melted butter (for topping)
Nutrition Facts
- Calories: Approximately 250 per serving (serves 6)
- Protein: 12g
- Fat: 15g
- Carbohydrates: 14g
- Fiber: 3g
- Sugar: 7g (mostly from milk and natural asparagus sugars)
- Sodium: 400mg (varies depending on cheese and added salt)
Irresistibly Creamy Cheesy Asparagus Gratin Recipe to Savor
- Total Time: 45 minutes
- Yield: 4 servings 1x
Description
Learn how to make delicious Cheesy Asparagus Gratin. Easy recipe with step-by-step instructions.
Ingredients
- 1 ½ pounds fresh asparagus, trimmed and cut into 2-inch pieces
- 2 tablespoons unsalted butter
- 2 cloves garlic, minced
- 2 tablespoons all-purpose flour
- 1 ½ cups whole milk (or 2% for a lighter option)
- 1 cup shredded Gruyère cheese (substitute with sharp cheddar or mozzarella if preferred)
- ½ cup grated Parmesan cheese
- ½ teaspoon salt, adjust to taste
- ¼ teaspoon freshly ground black pepper
- ¼ teaspoon nutmeg, freshly grated if possible
- ½ cup panko breadcrumbs (can use crushed crackers as a substitute)
- 1 tablespoon olive oil or melted butter (for topping)
Instructions
- Preheat your oven to 375°F (190°C). Lightly butter or grease a medium-sized baking dish—around 8×8 inches works well.
- Bring a large pot of salted water to a boil. Add the asparagus pieces and blanch for 2-3 minutes until bright green and just tender. Drain and immediately transfer to a bowl of ice water to stop the cooking. This step preserves that fresh bite and vibrant color I always aim for.
- In a medium saucepan, melt the butter over medium heat. Add the minced garlic and sauté for about 30 seconds until fragrant but not browned.
- Sprinkle the flour over the melted butter and garlic, whisking constantly to form a smooth roux. Cook for 1-2 minutes to remove the raw flour taste. This is where I learned patience early on—rushing this step is a common mistake that can make sauces grainy.
- Gradually pour in the milk while whisking to avoid lumps. Keep stirring until the sauce thickens and coats the back of a spoon, about 5-7 minutes.
- Remove from heat and stir in the Gruyère cheese, half of the Parmesan, salt, pepper, and nutmeg. Taste the sauce and adjust seasoning as needed. I always recommend tasting at this stage—trust me, it’s the best way to avoid surprises.
- Fold the blanched asparagus into the cheese sauce, then pour everything into your prepared baking dish, spreading it evenly.
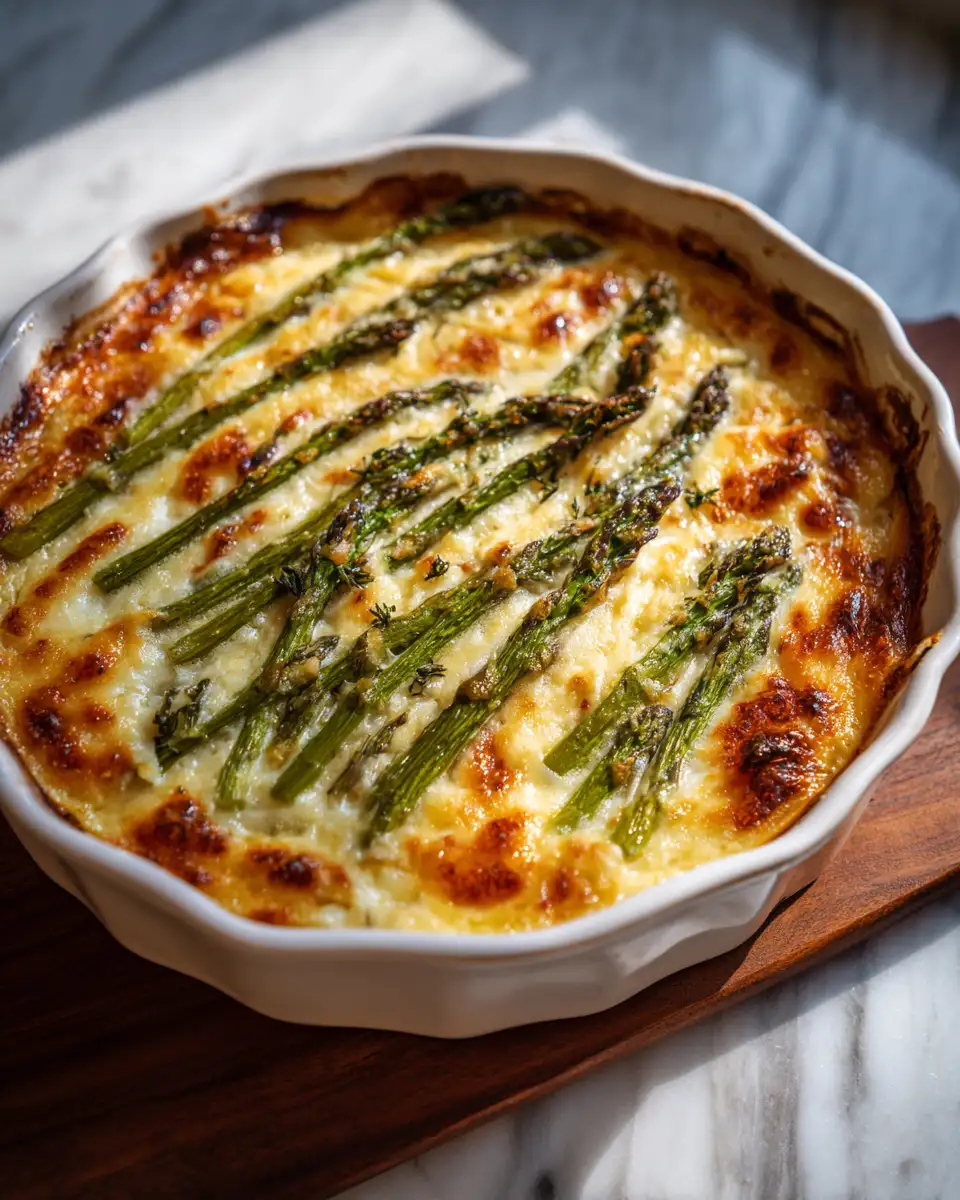
- In a small bowl, combine the panko breadcrumbs with olive oil or melted butter until evenly coated. Sprinkle this mixture over the top of the gratin, then scatter the remaining Parmesan cheese on top for that golden crust.
- Bake uncovered for 20-25 minutes, or until the top is bubbling and golden brown. I like to watch the last 5 minutes closely—nothing beats that moment when the crust turns perfectly crispy and inviting.
- Remove from the oven and let it rest for 5 minutes before serving. This helps the gratin set up a bit so it slices nicely.
- Prep Time: 15 minutes
- Cook Time: 30 minutes
- Category: Main Dish
- Method: Cooking
- Cuisine: International
Keywords: Cheesy Asparagus Gratin, recipe, cooking, food
Steps to Create Your Cheesy Asparagus Gratin
- Preheat your oven to 375°F (190°C). Lightly butter or grease a medium-sized baking dish—around 8×8 inches works well.
- Bring a large pot of salted water to a boil. Add the asparagus pieces and blanch for 2-3 minutes until bright green and just tender. Drain and immediately transfer to a bowl of ice water to stop the cooking. This step preserves that fresh bite and vibrant color I always aim for.
- In a medium saucepan, melt the butter over medium heat. Add the minced garlic and sauté for about 30 seconds until fragrant but not browned.
- Sprinkle the flour over the melted butter and garlic, whisking constantly to form a smooth roux. Cook for 1-2 minutes to remove the raw flour taste. This is where I learned patience early on—rushing this step is a common mistake that can make sauces grainy.
- Gradually pour in the milk while whisking to avoid lumps. Keep stirring until the sauce thickens and coats the back of a spoon, about 5-7 minutes.
- Remove from heat and stir in the Gruyère cheese, half of the Parmesan, salt, pepper, and nutmeg. Taste the sauce and adjust seasoning as needed. I always recommend tasting at this stage—trust me, it’s the best way to avoid surprises.
- Fold the blanched asparagus into the cheese sauce, then pour everything into your prepared baking dish, spreading it evenly.
- In a small bowl, combine the panko breadcrumbs with olive oil or melted butter until evenly coated. Sprinkle this mixture over the top of the gratin, then scatter the remaining Parmesan cheese on top for that golden crust.
- Bake uncovered for 20-25 minutes, or until the top is bubbling and golden brown. I like to watch the last 5 minutes closely—nothing beats that moment when the crust turns perfectly crispy and inviting.
- Remove from the oven and let it rest for 5 minutes before serving. This helps the gratin set up a bit so it slices nicely.
Tips for Making the Best Cheesy Asparagus Gratin
My journey in the kitchen taught me early on that small tweaks can make a big difference. Here are some tips I’ve picked up along the way:
- Don’t skip the blanching: It might seem like an extra step, but it locks in the asparagus’s bright color and prevents mushiness. I learned this the hard way during my early kitchen experiments—overcooked asparagus just doesn’t cut it.
- Use good-quality cheese: Gruyère adds a lovely nutty flavor and melts beautifully. When I’m in a pinch, sharp cheddar works, but avoid pre-shredded cheese with anti-caking agents—it can affect texture.
- Season thoughtfully: Remember my oversalted chili story? Taste your sauce before baking to avoid surprises. Nutmeg is subtle but adds warmth and depth.
- Top with texture: The buttery panko topping is key. If you want to add herbs like thyme or rosemary, sprinkle a little in the breadcrumbs for extra flavor.
- Make it ahead: You can assemble the gratin a few hours before baking and keep it in the fridge. Just add 5 extra minutes to the baking time if starting cold from the fridge.
Serving Suggestions and Pairings
This Cheesy Asparagus Gratin is a versatile side that pairs beautifully with a variety of mains. When I was hosting my Wednesday dinners back in college, it was a hit alongside simple roasted chicken or pan-seared pork chops. The creamy, cheesy richness complements lean proteins perfectly. Learn more: Savor the Spice: Irresistible Cajun Lobster Recipe
For a lighter meal, I often serve it with a crisp green salad tossed in a lemon vinaigrette to cut through the richness. If you’re aiming for something heartier, it’s fantastic with a crusty baguette to soak up any leftover sauce.
During springtime, when asparagus is at its peak, I like to bring this gratin to family gatherings or Sunday dinners with Maya and Eli. It’s always a crowd-pleaser and an easy way to get some greens on the table without fuss.
Storage and Reheating Tips
One of the reasons I love this gratin is how well it holds up for leftovers. After dinner, I just cover the dish tightly and pop it into the fridge.
- Store leftovers in an airtight container or cover the baking dish with foil or plastic wrap.
- Reheat in a preheated oven at 350°F (175°C) for 15-20 minutes until warmed through and bubbly again. This helps the topping stay crisp, unlike the microwave which can make it soggy.
- If you prefer the microwave for convenience, cover the dish loosely and heat in 1-minute increments, stirring gently to distribute heat.
- This gratin also freezes well. Freeze in an airtight container before baking, then thaw overnight in the fridge and bake as directed, adding extra time as needed.
Frequently Asked Questions
What are the main ingredients for Cheesy Asparagus Gratin?
The main ingredients for Cheesy Asparagus Gratin include the items listed in our ingredients section above. Each ingredient plays a crucial role in achieving the perfect flavor and texture.
How long does it take to make Cheesy Asparagus Gratin?
The total time to make Cheesy Asparagus Gratin includes both preparation and cooking time. Check the recipe card above for exact timing details.
Can I make Cheesy Asparagus Gratin ahead of time?
Yes, Cheesy Asparagus Gratin can often be prepared in advance. Store it properly in an airtight container in the refrigerator and consume within the recommended timeframe.
What can I serve with Cheesy Asparagus Gratin?
Cheesy Asparagus Gratin pairs well with various sides and accompaniments. Consider the serving suggestions mentioned in the recipe for the best dining experience.
Is Cheesy Asparagus Gratin suitable for special diets?
Depending on the ingredients used, Cheesy Asparagus Gratin may be adapted for various dietary needs. Check the ingredients list and consider substitutions as needed for your dietary requirements.
Final Thoughts
Creating this Cheesy Asparagus Gratin has been a rewarding journey, blending my love for simple, reliable home cooking with a dish that feels special enough for any occasion. It’s a recipe born from my early kitchen experiments and the lessons learned from family meals in that small coastal town where food was always about connection.
Whether you’re a beginner or someone who loves to tweak and perfect recipes, this gratin invites you to enjoy the process and the comforting payoff. Remember, like my early chili mishap taught me, cooking is as much about learning and experimenting as it is about the final plate. So, gather your ingredients, roll up your sleeves, and know you’ve got this. Your table—and your family—will thank you.
