
There’s something about halloween cookies that instantly brings a smile to my face—maybe it’s the nostalgia of those chilly October evenings back home in my small coastal town, where the kitchen would fill with the warmth of baking and laughter. I remember how my parents turned whatever we had in the pantry into simple, comforting dishes that made every family dinner feel like a celebration. Those same principles apply when I make halloween cookies today: approachable, fun, and full of flavor without fuss. Whether you’re baking with kids or just want to add a little festive magic to your weeknight routine, these cookies are a perfect way to connect, create, and enjoy the season right from your own kitchen.
Table of Contents
Why You’ll Love This halloween cookies
These halloween cookies are more than just a seasonal treat—they’re a testament to the joy of simple, reliable baking that anyone can master. Growing up, I learned early on that balance is key, especially after a memorable night when I oversalted a pot of chili and had to troubleshoot my way to a fix. That lesson translates here: the flavors in these cookies are carefully balanced so the spices complement rather than overpower, and the sweetness hits just right. Plus, they bake up beautifully, with crisp edges and soft centers that are kid-approved (a must for me, since Eli’s stamp of approval decides if a recipe stays). They’re affordable, easy to whip up with pantry staples, and versatile enough for decorating or enjoying plain with a cold glass of milk.
What’s especially great about these cookies is that they fit neatly into busy lives. You don’t need fancy equipment or rare ingredients—just a few simple steps, and you’re rewarded with chewy, spiced cookies that smell like autumn itself. Whether you’re hosting a Halloween party or just want to add a little fun to a Wednesday dinner, these cookies bring a touch of homemade warmth without the overwhelm.
Ingredients You’ll Need for This halloween cookies
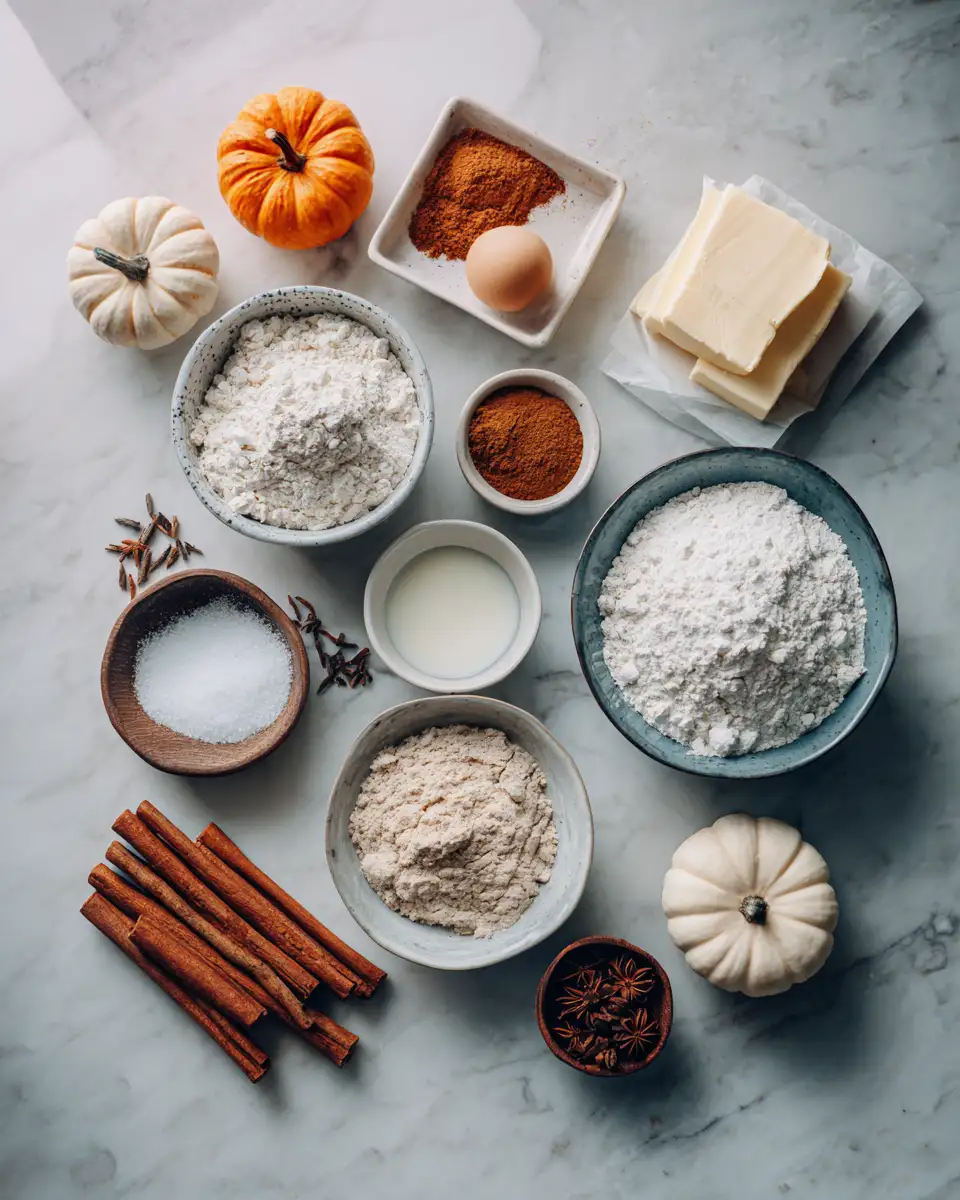
- 2 ½ cups all-purpose flour (you can substitute with whole wheat pastry flour for a nuttier flavor)
- 1 teaspoon baking soda
- 1 teaspoon ground cinnamon
- ½ teaspoon ground ginger
- ¼ teaspoon ground cloves
- ¼ teaspoon salt
- ¾ cup unsalted butter, softened (or use coconut oil for a dairy-free option)
- 1 cup packed light brown sugar
- ½ cup granulated sugar
- 1 large egg
- 1 teaspoon vanilla extract
- 2 tablespoons molasses (optional but adds depth and richness)
- Halloween-themed sprinkles or mini chocolate chips for decorating (optional)
When I first started baking these cookies, I often swapped out molasses when I didn’t have it on hand, using extra brown sugar instead. While it’s not quite the same, it still produces a tasty cookie. Also, I like to keep these substitutions in mind when cooking for friends with dietary restrictions—sometimes just a simple swap in fat or flour can make all the difference.
Nutrition Facts
- Calories: Approximately 180 per cookie (based on 24 cookies)
- Protein: 2g per cookie
- Fat: 8g per cookie (mostly from butter)
- Carbohydrates: 26g per cookie
- Fiber: 1g per cookie
- Sugar: 14g per cookie
- Sodium: 110mg per cookie
These numbers are a reminder that halloween cookies are a treat to be enjoyed mindfully—balanced flavor and texture come with a bit of sugar and fat, but the joy they bring around the table is worth every bite. When I bake for our family, I try to balance sweet treats with hearty dinners, just like those Wednesday meals in college that kept everyone happy and full without breaking the bank.
Print
Spooktacular Halloween Cookies That Will Haunt Your Taste Buds
- Total Time: 45 minutes
- Yield: 4 servings 1x
Description
Learn how to make delicious halloween cookies. Easy recipe with step-by-step instructions.
Ingredients
- 2 ½ cups all-purpose flour (you can substitute with whole wheat pastry flour for a nuttier flavor)
- 1 teaspoon baking soda
- 1 teaspoon ground cinnamon
- ½ teaspoon ground ginger
- ¼ teaspoon ground cloves
- ¼ teaspoon salt
- ¾ cup unsalted butter, softened (or use coconut oil for a dairy-free option)
- 1 cup packed light brown sugar
- ½ cup granulated sugar
- 1 large egg
- 1 teaspoon vanilla extract
- 2 tablespoons molasses (optional but adds depth and richness)
- Halloween-themed sprinkles or mini chocolate chips for decorating (optional)
When I first started baking these cookies, I often swapped out molasses when I didn’t have it on hand, using extra brown sugar instead. While it’s not quite the same, it still produces a tasty cookie. Also, I like to keep these substitutions in mind when cooking for friends with dietary restrictions—sometimes just a simple swap in fat or flour can make all the difference.
Instructions
- Preheat your oven to 350°F (175°C) and line two baking sheets with parchment paper. This step might seem basic, but having everything ready ahead of time makes the process smoother—something I learned hosting weekly dinners for friends.
- In a medium bowl, whisk together the flour, baking soda, cinnamon, ginger, cloves, and salt. Set aside. This spice blend is what gives these cookies their seasonal charm, balanced so none of the flavors steal the spotlight.
- In a large bowl, use a hand mixer or stand mixer to cream the softened butter, brown sugar, and granulated sugar until light and fluffy—about 3 to 4 minutes. This aeration is key for texture, and it’s a step I never skip, even when in a hurry.
- Add the egg, vanilla extract, and molasses (if using) to the butter mixture. Beat until combined, scraping down the sides as needed. The molasses adds a depth I fondly remember from my family’s holiday baking sessions.
- Gradually add the dry ingredients to the wet ingredients, mixing on low until just combined. Overmixing can toughen cookies, so stop as soon as the flour disappears.
- Using a cookie scoop or tablespoon, drop dough onto the prepared baking sheets, spacing about 2 inches apart. If you want to add sprinkles or mini chocolate chips, gently press them onto the tops now.
- Bake for 10 to 12 minutes or until the edges are golden but the centers still look slightly soft. Remember, cookies continue to cook a bit on the hot pan, so pulling them out at the right time is a skill I’ve honed over years of trial and error.
- Let the cookies cool on the baking sheets for 5 minutes before transferring to a wire rack to cool completely. This resting time helps the cookies set up and keeps them chewy.
This step-by-step approach is exactly what I share with friends when they ask how to bake consistently good cookies. It’s all about pacing and paying attention to the little cues—like the smell of cinnamon filling the kitchen or the slight golden tint on the edges—that tell you the cookies are just right.
- Prep Time: 15 minutes
- Cook Time: 30 minutes
- Category: Main Dish
- Method: Cooking
- Cuisine: International
Keywords: halloween cookies, recipe, cooking, food
Steps to Create Your halloween cookies
- Preheat your oven to 350°F (175°C) and line two baking sheets with parchment paper. This step might seem basic, but having everything ready ahead of time makes the process smoother—something I learned hosting weekly dinners for friends.
- In a medium bowl, whisk together the flour, baking soda, cinnamon, ginger, cloves, and salt. Set aside. This spice blend is what gives these cookies their seasonal charm, balanced so none of the flavors steal the spotlight.
- In a large bowl, use a hand mixer or stand mixer to cream the softened butter, brown sugar, and granulated sugar until light and fluffy—about 3 to 4 minutes. This aeration is key for texture, and it’s a step I never skip, even when in a hurry.
- Add the egg, vanilla extract, and molasses (if using) to the butter mixture. Beat until combined, scraping down the sides as needed. The molasses adds a depth I fondly remember from my family’s holiday baking sessions.
- Gradually add the dry ingredients to the wet ingredients, mixing on low until just combined. Overmixing can toughen cookies, so stop as soon as the flour disappears.
- Using a cookie scoop or tablespoon, drop dough onto the prepared baking sheets, spacing about 2 inches apart. If you want to add sprinkles or mini chocolate chips, gently press them onto the tops now.
- Bake for 10 to 12 minutes or until the edges are golden but the centers still look slightly soft. Remember, cookies continue to cook a bit on the hot pan, so pulling them out at the right time is a skill I’ve honed over years of trial and error.
- Let the cookies cool on the baking sheets for 5 minutes before transferring to a wire rack to cool completely. This resting time helps the cookies set up and keeps them chewy.
This step-by-step approach is exactly what I share with friends when they ask how to bake consistently good cookies. It’s all about pacing and paying attention to the little cues—like the smell of cinnamon filling the kitchen or the slight golden tint on the edges—that tell you the cookies are just right. Learn more: Earl Grey Cookies
Tips for Making the Best halloween cookies
From my early kitchen experiments to hosting those beloved Wednesday dinners, I’ve learned that small tweaks can make a big difference:
- Don’t skip chilling the dough: If time allows, chill your dough for at least 30 minutes. It makes the cookies easier to handle and helps control spreading. I usually do this while cleaning up or prepping dinner, turning downtime into productive moments.
- Use room temperature butter and eggs: This helps the ingredients blend smoothly and traps air in the dough, leading to lighter cookies.
- Experiment with spices: If cloves feel too strong, try swapping with nutmeg or allspice. I often adjust the spice mix depending on what Eli and Maya prefer, making the cookies just right for our family palate.
- Watch your oven closely: Every oven is different, so start checking cookies a minute or two before the timer goes off. Overbaking is a common rookie mistake, one I learned to avoid after many batches of tough cookies.
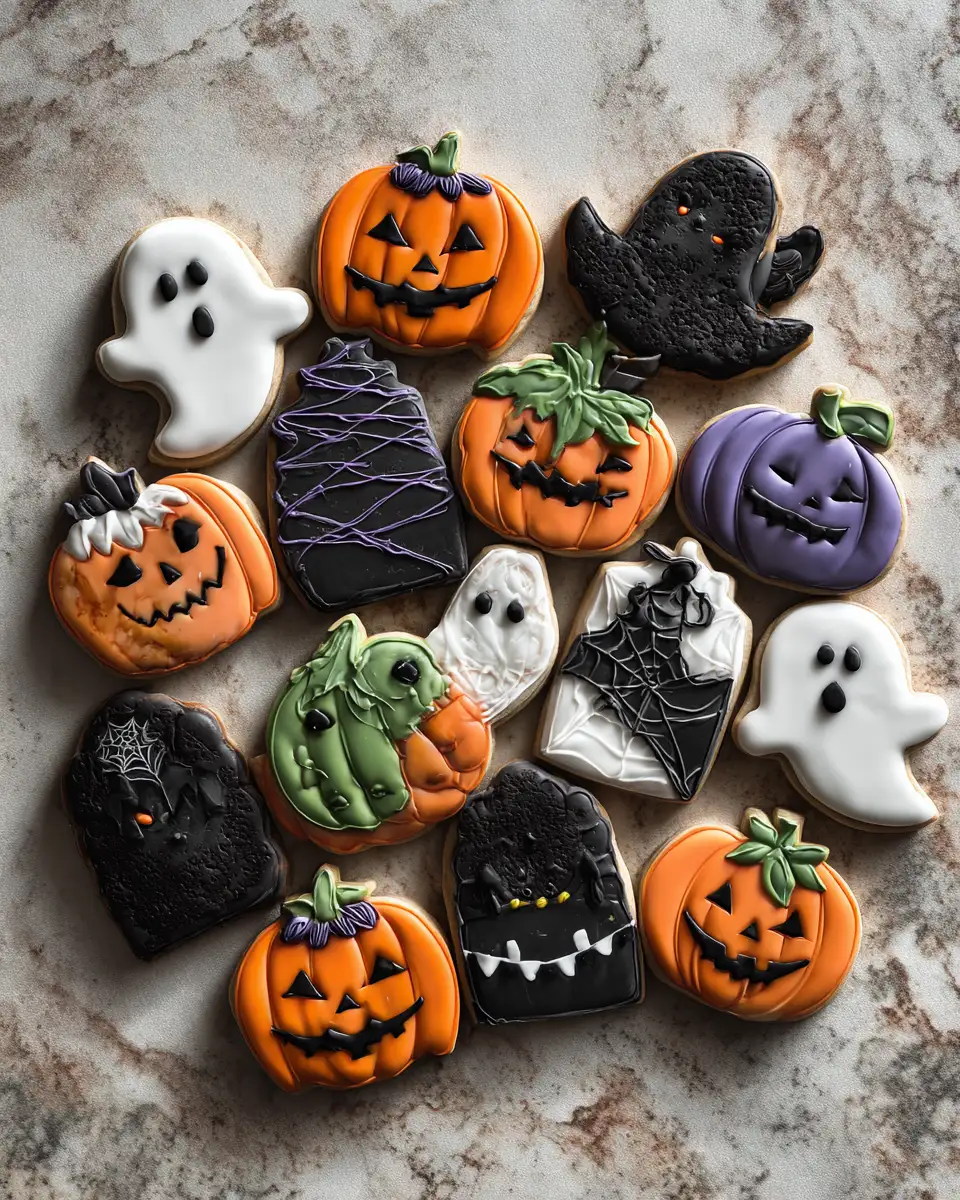
- Get creative with decorations: Let kids top the cookies with sprinkles, icing, or edible eyes. It’s a fun way to get everyone involved and makes the baking experience memorable.
“Cooking, much like those family dinners I grew up with, is about trial, error, and sharing. Every mistake teaches you a little more about what works.”
Serving Suggestions and Pairings
These halloween cookies pair beautifully with classic fall drinks and simple accompaniments that bring out their warm spice notes. For our family, nothing beats a glass of cold milk alongside these cookies—Eli’s favorite combo. Here are a few ideas to elevate your cookie moment:
- Serve alongside hot apple cider or pumpkin spice latte for a cozy autumn vibe.
- Pair with a scoop of vanilla ice cream to turn your cookies into an easy dessert.
- Use as a base for a Halloween-themed ice cream sandwich—perfect for a festive treat.
- Offer alongside a cheese platter with mild cheddar or gouda for a surprising sweet-and-savory twist.
When I planned meals around these cookies during our college days, I often kept the sides simple so the cookies could shine. It’s that balance of comfort and celebration that makes these little treats special.
Storage and Reheating Tips
One of the best things about these halloween cookies is their staying power. Whether you’re prepping ahead for a party or just want to keep a batch on hand for after-school snacks, here’s how I keep them fresh:
- Store cookies in an airtight container at room temperature for up to 5 days. I always recommend placing a slice of bread in the container to help maintain moisture—it’s a little trick I picked up from my parents’ kitchen.
- For longer storage, freeze baked cookies in a single layer on a baking sheet, then transfer to a freezer-safe bag or container. They keep well for up to 3 months.
- To enjoy frozen cookies, thaw at room temperature or warm gently in a 300°F oven for 5 minutes to freshen them up.
- If you freeze the dough instead, scoop balls onto a tray and freeze before storing. Bake straight from frozen, adding a couple of extra minutes to the bake time.
Keeping these storage tips in mind helps me manage busy weeks without sacrificing homemade flavor—a balance I know many home cooks appreciate.
Frequently Asked Questions
What are the main ingredients for halloween cookies?
The main ingredients for halloween cookies include the items listed in our ingredients section above. Each ingredient plays a crucial role in achieving the perfect flavor and texture.
How long does it take to make halloween cookies?
The total time to make halloween cookies includes both preparation and cooking time. Check the recipe card above for exact timing details.
Can I make halloween cookies ahead of time?
Yes, halloween cookies can often be prepared in advance. Store it properly in an airtight container in the refrigerator and consume within the recommended timeframe.
What can I serve with halloween cookies?
halloween cookies pairs well with various sides and accompaniments. Consider the serving suggestions mentioned in the recipe for the best dining experience.
Is halloween cookies suitable for special diets?
Depending on the ingredients used, halloween cookies may be adapted for various dietary needs. Check the ingredients list and consider substitutions as needed for your dietary requirements.
Final Thoughts
Making halloween cookies has become one of those comforting rituals that connects me to my roots and keeps the spirit of family dinners alive in my own home. From the first taste of dough to the moment they come out of the oven smelling like fall, these cookies embody the joy of simple, thoughtful cooking. I hope this recipe encourages you to get into the kitchen, experiment a little, and share something delicious with the people you love.
Remember, just like my early chili mishap taught me, the kitchen is all about learning and finding balance. You don’t need to be a professional baker to make these cookies shine—just a willingness to enjoy the process and savor the results. So grab your ingredients, gather the family, and bake up some halloween cookies that bring warmth and smiles to your table. You’ve got this.
