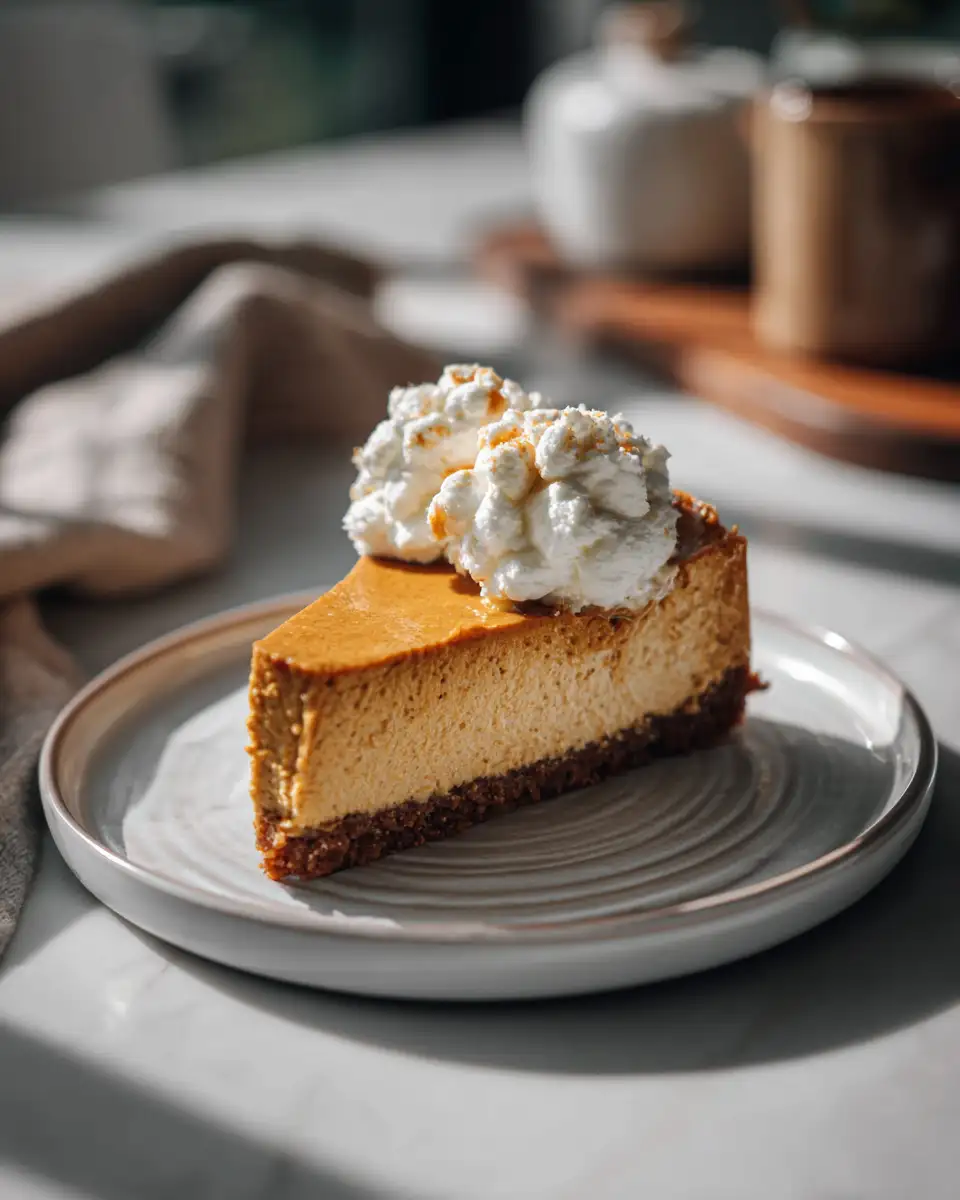
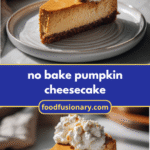
There’s something wonderfully cozy about a no bake pumpkin cheesecake that feels just right for the season—or honestly, any time you’re craving that perfect mix of creamy sweetness and warm spice without turning on the oven. Growing up in a small coastal town, where family dinners were the heart of our home, I learned early on how much joy a simple, thoughtfully made dessert could bring everyone together. This no bake pumpkin cheesecake is one of those recipes that’s become a staple in my kitchen, especially on busy weeknights or when Maya and I want to whip up something special for Eli without the fuss. It’s creamy, comforting, and surprisingly easy to make, with flavors that remind me of those cozy evenings around the table, stretching pantry staples into a treat that feels like a hug in dessert form.
Table of Contents
Why You’ll Love This no bake pumpkin cheesecake
I remember my first attempt at a no bake pumpkin cheesecake like it was yesterday—though honestly, it wasn’t perfect. I’d oversalted a chili earlier that day (a classic twelve-year-old kitchen mishap), so I was feeling pretty cautious about dessert. What I love most about this recipe is how forgiving it is. The no bake version means you don’t have to worry about cracking or drying out your cheesecake, which is a game-changer if you’re juggling family dinners or a busy schedule. It sets up beautifully in the fridge, giving you creamy, luscious layers without the oven heat or the timer stress.
This no bake pumpkin cheesecake combines the smooth richness of cream cheese with the earthy sweetness of pumpkin puree and just the right blend of fall spices. The crust is buttery and crisp, made from graham crackers or digestive biscuits, which adds a great texture contrast. Plus, it’s budget-friendly and uses ingredients you probably already have, a nod to those early days of stretching pantry staples into something magical. Whether you’re serving it to guests or sneaking a slice after Eli’s bedtime (no judgment here), it’s a dessert that feels both special and accessible.
Ingredients You’ll Need for This no bake pumpkin cheesecake
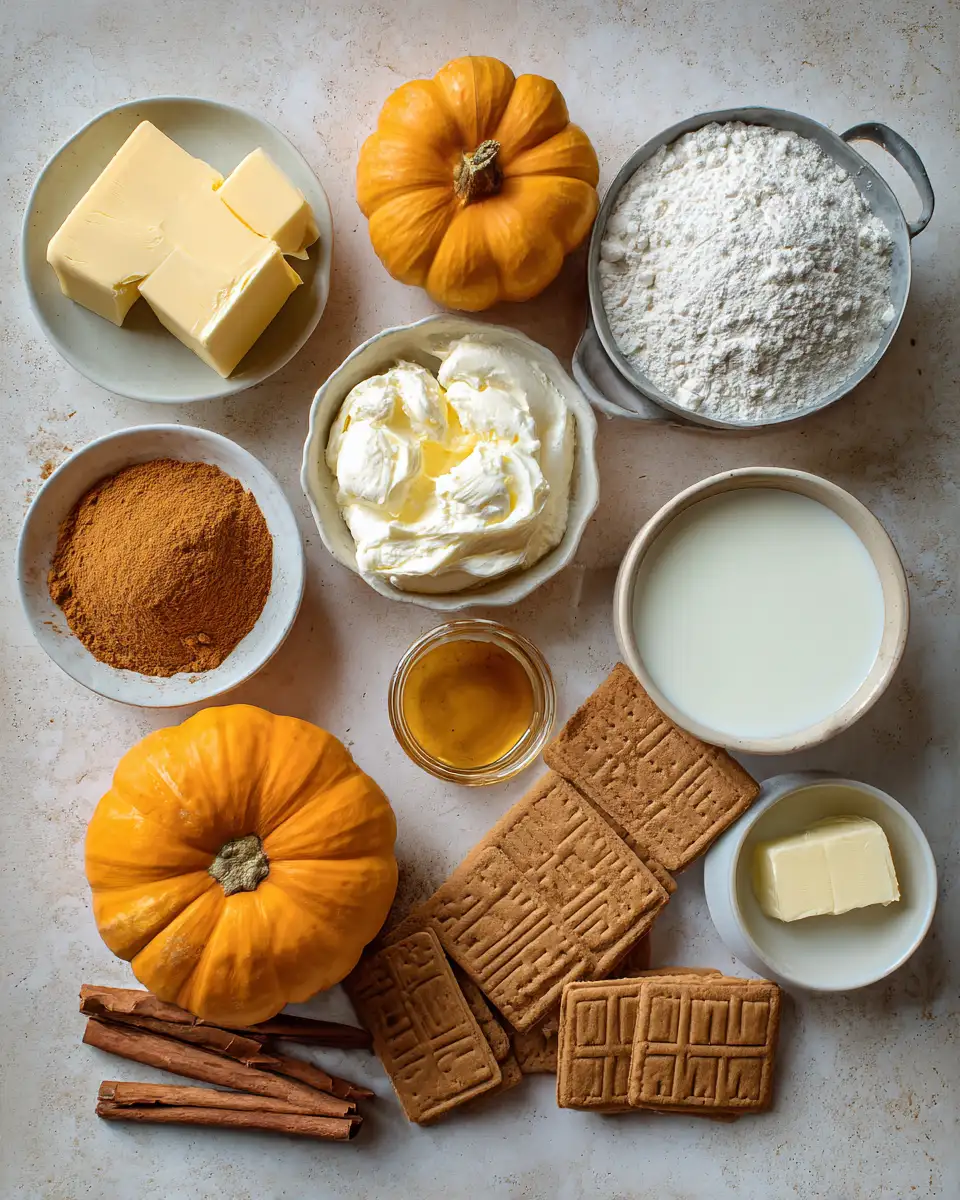
- 1 ½ cups graham cracker crumbs (or digestive biscuits, crushed)
- 6 tablespoons unsalted butter, melted
- 1 cup cream cheese, softened (about 8 ounces)
- ¾ cup canned pumpkin puree (not pumpkin pie filling)
- ½ cup powdered sugar
- 1 teaspoon vanilla extract
- 1 teaspoon ground cinnamon
- ½ teaspoon ground ginger
- ¼ teaspoon ground nutmeg
- 1 cup heavy whipping cream, cold
- 2 tablespoons granulated sugar (for whipping cream)
Substitution tips: If you want to lighten it up a bit, try using Greek yogurt instead of some of the cream cheese—about half a cup swapped in works well. For a dairy-free option, use coconut cream in place of heavy cream and a plant-based cream cheese alternative. Maple syrup or honey can replace powdered sugar for a natural sweetener twist, just adjust to taste.
Nutrition Facts
- Calories: Approximately 350 per serving (based on 8 servings)
- Protein: 5g
- Fat: 26g (mostly from cream cheese and butter)
- Carbohydrates: 28g
- Fiber: 2g
- Sugar: 18g
- Sodium: 200mg
These numbers will vary slightly depending on your ingredient choices and portion sizes, but overall this dessert strikes a good balance between indulgence and nutrition—especially when you consider the pumpkin adds a nice dose of fiber and vitamin A.
Print
Creamy No Bake Pumpkin Cheesecake Recipe for Fall Indulgence
- Total Time: 45 minutes
- Yield: 4 servings 1x
Description
Learn how to make delicious no bake pumpkin cheesecake. Easy recipe with step-by-step instructions.
Ingredients
- 1 ½ cups graham cracker crumbs (or digestive biscuits, crushed)
- 6 tablespoons unsalted butter, melted
- 1 cup cream cheese, softened (about 8 ounces)
- ¾ cup canned pumpkin puree (not pumpkin pie filling)
- ½ cup powdered sugar
- 1 teaspoon vanilla extract
- 1 teaspoon ground cinnamon
- ½ teaspoon ground ginger
- ¼ teaspoon ground nutmeg
- 1 cup heavy whipping cream, cold
- 2 tablespoons granulated sugar (for whipping cream)
Substitution tips: If you want to lighten it up a bit, try using Greek yogurt instead of some of the cream cheese—about half a cup swapped in works well. For a dairy-free option, use coconut cream in place of heavy cream and a plant-based cream cheese alternative. Maple syrup or honey can replace powdered sugar for a natural sweetener twist, just adjust to taste.
Instructions
- Start by preparing the crust. In a medium bowl, combine graham cracker crumbs and melted butter. Stir until the mixture resembles wet sand and holds together when pressed.
- Press the crust mixture firmly into the bottom of an 8-inch springform pan or a pie dish. Use the back of a spoon or a flat-bottomed glass to compact it evenly. Chill in the refrigerator for at least 15 minutes while you prepare the filling.
- In a large bowl, beat the softened cream cheese with an electric mixer until smooth and creamy, about 2-3 minutes. This step is key—take your time here to avoid lumps.
- Add the pumpkin puree, powdered sugar, vanilla extract, cinnamon, ginger, and nutmeg. Beat again until everything is well combined and the mixture is smooth.
- In a separate chilled bowl, whip the heavy cream with the granulated sugar until medium to stiff peaks form. This usually takes about 3-4 minutes on medium-high speed. If you’re new to whipping cream, look for firm peaks that hold their shape but still look soft.
- Gently fold about one-third of the whipped cream into the pumpkin mixture to lighten it up. Then, carefully fold in the remaining whipped cream until fully combined but still fluffy. Avoid overmixing to keep the filling airy.
- Pour the filling over the chilled crust and smooth the top with a spatula. Cover with plastic wrap or a lid and refrigerate for at least 4 hours, preferably overnight, to allow the cheesecake to set properly.
- Before serving, run a thin knife around the edge of the pan to loosen the cheesecake. Remove the springform ring if using, and slice with a sharp knife, wiping the blade clean between cuts for neat slices.
One tip from my early kitchen experiments: don’t rush the chilling time. I once tried to serve a no bake cheesecake too soon, and it ended up more like a pumpkin mousse disaster. Patience here really pays off—you’ll be rewarded with that perfect creamy texture that holds up beautifully.
- Prep Time: 15 minutes
- Cook Time: 30 minutes
- Category: Main Dish
- Method: Cooking
- Cuisine: International
Keywords: no bake pumpkin cheesecake, recipe, cooking, food
Steps to Create Your no bake pumpkin cheesecake
- Start by preparing the crust. In a medium bowl, combine graham cracker crumbs and melted butter. Stir until the mixture resembles wet sand and holds together when pressed.
- Press the crust mixture firmly into the bottom of an 8-inch springform pan or a pie dish. Use the back of a spoon or a flat-bottomed glass to compact it evenly. Chill in the refrigerator for at least 15 minutes while you prepare the filling.
- In a large bowl, beat the softened cream cheese with an electric mixer until smooth and creamy, about 2-3 minutes. This step is key—take your time here to avoid lumps.
- Add the pumpkin puree, powdered sugar, vanilla extract, cinnamon, ginger, and nutmeg. Beat again until everything is well combined and the mixture is smooth.
- In a separate chilled bowl, whip the heavy cream with the granulated sugar until medium to stiff peaks form. This usually takes about 3-4 minutes on medium-high speed. If you’re new to whipping cream, look for firm peaks that hold their shape but still look soft.
- Gently fold about one-third of the whipped cream into the pumpkin mixture to lighten it up. Then, carefully fold in the remaining whipped cream until fully combined but still fluffy. Avoid overmixing to keep the filling airy.
- Pour the filling over the chilled crust and smooth the top with a spatula. Cover with plastic wrap or a lid and refrigerate for at least 4 hours, preferably overnight, to allow the cheesecake to set properly.
- Before serving, run a thin knife around the edge of the pan to loosen the cheesecake. Remove the springform ring if using, and slice with a sharp knife, wiping the blade clean between cuts for neat slices.
One tip from my early kitchen experiments: don’t rush the chilling time. I once tried to serve a no bake cheesecake too soon, and it ended up more like a pumpkin mousse disaster. Patience here really pays off—you’ll be rewarded with that perfect creamy texture that holds up beautifully. Learn more: Indulge in the Ultimate Decadent Pumpkin Swirl Gingersnap Cheesecake Delight
Tips for Making the Best no bake pumpkin cheesecake
Over the years, I’ve learned the little details that can make or break a no bake pumpkin cheesecake. Like that oversalted chili night, it’s all about balance and paying attention to texture:
- Use full-fat cream cheese and heavy cream. It’s tempting to go low-fat, but full-fat creates the best creamy, rich texture.
- Soften your cream cheese fully. Take it out of the fridge 30 minutes before mixing, or soften gently in the microwave in 5-second bursts.
- Whip the cream just right. Too soft, and your filling will be runny; too stiff, and it can become grainy. Medium to stiff peaks are the sweet spot.
- Don’t skip the chilling time. This step is crucial for the cheesecake to set properly and develop flavor.
- Adjust spices to your taste. I often tweak the cinnamon and ginger depending on the season or mood—sometimes a pinch of cloves or allspice sneaks in, especially around the holidays.
- Make ahead and freeze. This cheesecake freezes well, so it’s perfect for prepping in advance. Just thaw in the fridge overnight before serving.
Serving Suggestions and Pairings
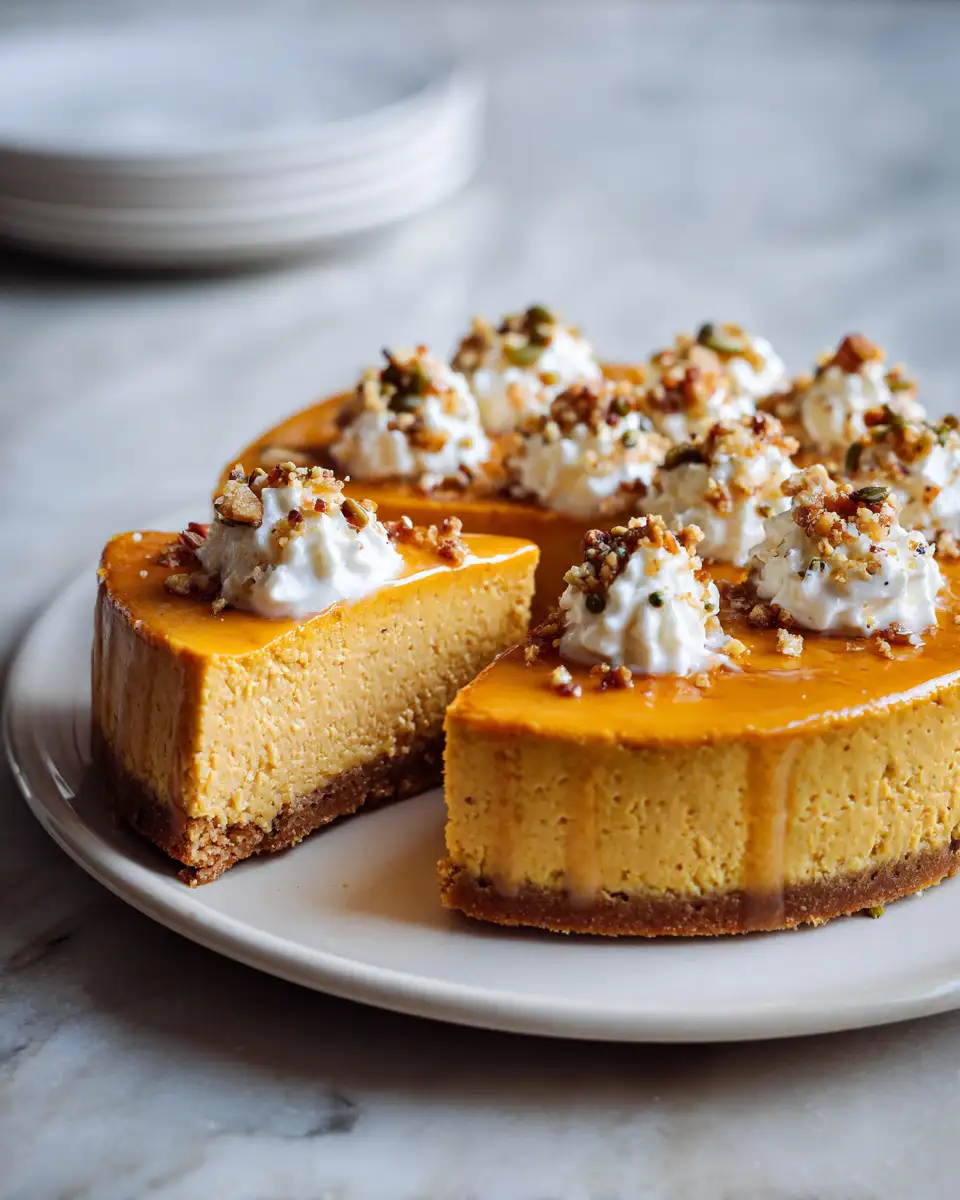
One of my favorite parts about this no bake pumpkin cheesecake is how versatile it is at the table. Eli, my little taste tester, loves it plain—sometimes with just a dollop of whipped cream on top. But I also like to dress it up depending on the occasion:
- A drizzle of warm caramel sauce or maple syrup adds a luscious sweetness that pairs beautifully with the pumpkin spices.
- Freshly whipped cream with a sprinkle of cinnamon or crushed pecans adds texture and visual appeal.
- Serve alongside spiced chai tea or a rich coffee for a cozy dessert experience.
- Top with toasted pecans or walnuts for a bit of crunch and nutty flavor.
- A spoonful of homemade cranberry sauce or a few fresh berries helps cut through the richness and adds brightness.
Back when I hosted those Wednesday dinners in college, this cheesecake was always a crowd-pleaser—simple enough to make ahead, but impressive enough to feel like a treat. It’s perfect for fall gatherings, holiday parties, or just a quiet night at home when you want to end on a sweet note.
Storage and Reheating Tips
Since this is a no bake pumpkin cheesecake, it’s meant to be served chilled, so reheating isn’t necessary. Here’s how to keep it at its best:
- Refrigerate: Store leftovers covered tightly with plastic wrap or an airtight lid in the fridge for up to 4 days. The crust might soften slightly, but the flavors will deepen.
- Freeze: Wrap the cheesecake well with plastic wrap and then foil, or store in an airtight container, and freeze for up to 2 months. Thaw overnight in the fridge before serving.
- Avoid room temperature: Because of the cream cheese and heavy cream, this dessert should stay cold to maintain texture and food safety.
If you want to freshen it up after refrigeration, a quick stir of some freshly whipped cream or a light dusting of cinnamon can bring back some brightness to the top layer.
Frequently Asked Questions
What are the main ingredients for no bake pumpkin cheesecake?
The main ingredients for no bake pumpkin cheesecake include the items listed in our ingredients section above. Each ingredient plays a crucial role in achieving the perfect flavor and texture.
How long does it take to make no bake pumpkin cheesecake?
The total time to make no bake pumpkin cheesecake includes both preparation and cooking time. Check the recipe card above for exact timing details.
Can I make no bake pumpkin cheesecake ahead of time?
Yes, no bake pumpkin cheesecake can often be prepared in advance. Store it properly in an airtight container in the refrigerator and consume within the recommended timeframe.
What can I serve with no bake pumpkin cheesecake?
no bake pumpkin cheesecake pairs well with various sides and accompaniments. Consider the serving suggestions mentioned in the recipe for the best dining experience.
Is no bake pumpkin cheesecake suitable for special diets?
Depending on the ingredients used, no bake pumpkin cheesecake may be adapted for various dietary needs. Check the ingredients list and consider substitutions as needed for your dietary requirements.
Final Thoughts
Looking back, that early kitchen blunder with the chili taught me more than just how to fix an oversalted pot—it sparked a lifelong love of problem-solving and balancing flavors, which is exactly what this no bake pumpkin cheesecake is all about. It’s a recipe that embraces simplicity without sacrificing flavor or texture, perfect for busy home cooks like me who want to create something special without extra stress. It’s also a reminder that the best meals and desserts come from the heart, from ingredients stretched with care, and from moments shared around the table.
Whether you’re a seasoned home cook or just starting out, this no bake pumpkin cheesecake is a crowd-pleaser that fits beautifully into everyday life. It’s reliable, approachable, and a little bit comforting—just like those family dinners that inspired me to keep cooking in the first place. So give it a try, take your time, and enjoy every creamy, spiced bite. You’ve got this.