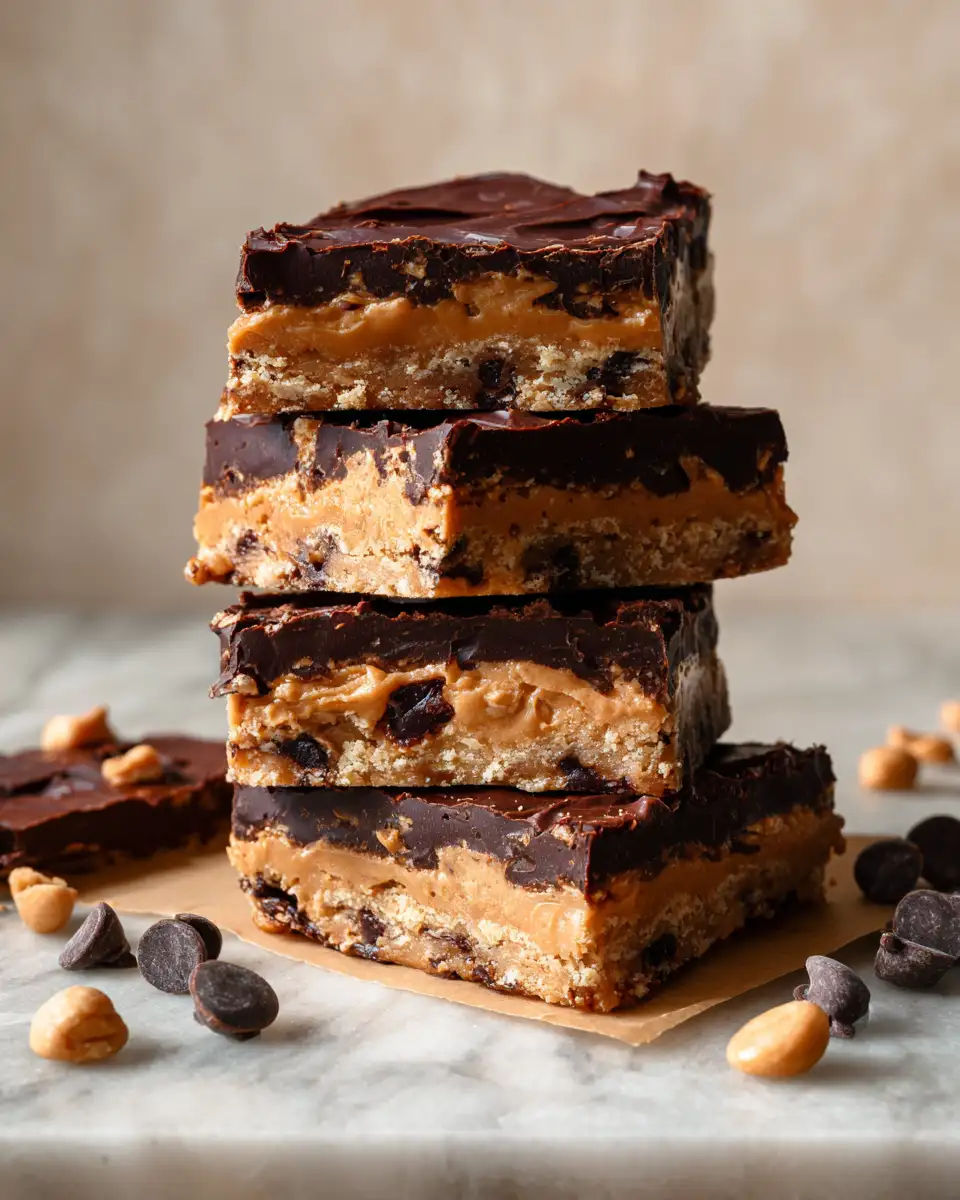
There’s something about the humble Peanut Butter Lunch Lady Bar that immediately takes me back to my childhood kitchen, where simple ingredients transformed into comforting treats that everyone loved. Growing up in a small coastal town, desserts like these were more than just snacks—they were moments of joy, little celebrations after long days. I remember experimenting with peanut butter recipes after that infamous oversalted chili incident when I was twelve, and the way peanut butter brought balance and richness to dishes fascinated me ever since. This bar recipe is a tribute to those early lessons in flavor and fixing kitchen mishaps, but with the kind of reliability any home cook can lean on, whether you’re feeding a crowd or just treating yourself.
Table of Contents
Why You’ll Love This Peanut Butter Lunch Lady Bar
First off, these bars are the kind of recipe I love because they’re easy, affordable, and genuinely satisfying—qualities I learned to appreciate hosting my “Wednesday dinners” in college. They use pantry staples and come together quickly, perfect for busy weeknights or when you need a reliable sweet fix without fuss. The peanut butter gives these bars a creamy, nutty backbone, while a touch of honey adds just enough sweetness without overwhelming the natural flavors. Plus, they’re sturdy enough to pack in lunchboxes or enjoy as an afternoon pick-me-up—something I always tested with my son Eli before sharing them here. If you’re like me, a home cook who values simple, no-nonsense recipes that fill your kitchen with warmth and your family with smiles, these bars will quickly become a favorite.
Ingredients You’ll Need for This Peanut Butter Lunch Lady Bar
- 1 cup creamy peanut butter (natural or regular, depending on your preference)
- 1/2 cup honey (you can substitute maple syrup if preferred)
- 1 large egg
- 1 teaspoon vanilla extract
- 1 cup old-fashioned rolled oats
- 1/2 cup whole wheat flour (all-purpose flour works too)
- 1/2 teaspoon baking soda
- 1/4 teaspoon salt
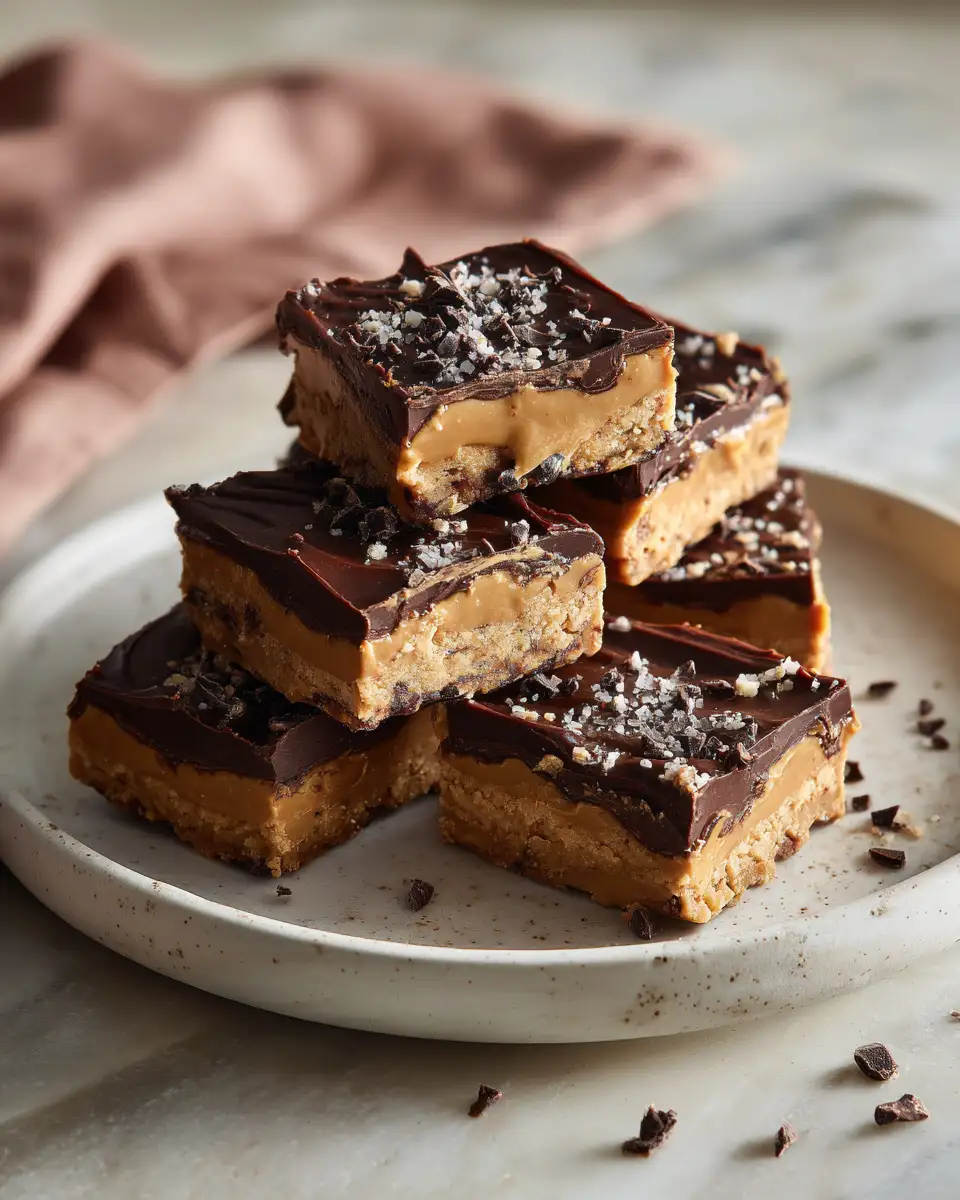
- 1/3 cup mini chocolate chips (optional but highly recommended for a touch of indulgence)
Substitutions are part of what I love about home cooking—feel free to swap the peanut butter for almond or sunflower seed butter if allergies are a concern, and the flour can be gluten-free if that’s your kitchen vibe. These bars are forgiving, just like the dishes I learned to tweak after kitchen mishaps.
Nutrition Facts
- Calories: 220 per bar (makes 12 bars)
- Protein: 6g
- Fat: 12g (mostly from healthy fats in peanut butter)
- Carbohydrates: 22g
- Fiber: 3g
- Sugar: 10g (from honey and chocolate chips)
- Sodium: 150mg
This balanced profile reflects the kind of snack I trust to fuel our busy days without weighing us down. When I serve these at home, I appreciate that they provide protein and fiber too, making them more than just an empty treat.
Print
The Ultimate Peanut Butter Lunch Lady Bar Recipe You Need to Try
- Total Time: 45 minutes
- Yield: 4 servings 1x
Description
Learn how to make delicious Peanut Butter Lunch Lady Bar. Easy recipe with step-by-step instructions.
Ingredients
- 1 cup creamy peanut butter (natural or regular, depending on your preference)
- 1/2 cup honey (you can substitute maple syrup if preferred)
- 1 large egg
- 1 teaspoon vanilla extract
- 1 cup old-fashioned rolled oats
- 1/2 cup whole wheat flour (all-purpose flour works too)
- 1/2 teaspoon baking soda
- 1/4 teaspoon salt
- 1/3 cup mini chocolate chips (optional but highly recommended for a touch of indulgence)
Substitutions are part of what I love about home cooking—feel free to swap the peanut butter for almond or sunflower seed butter if allergies are a concern, and the flour can be gluten-free if that’s your kitchen vibe. These bars are forgiving, just like the dishes I learned to tweak after kitchen mishaps.
Instructions
- Preheat your oven to 350°F (175°C) and line an 8×8-inch baking pan with parchment paper, leaving some overhang to lift the bars out easily.
- In a large mixing bowl, combine the peanut butter and honey. Stir together until smooth and well blended. I find this step easiest when the peanut butter is at room temperature, so the mixture blends evenly without lumps.
- Beat in the egg and vanilla extract until fully incorporated. This helps bind the bars and adds a little richness.
- In a separate bowl, whisk together the rolled oats, whole wheat flour, baking soda, and salt. This dry mix is where the texture begins to take shape.
- Gradually fold the dry ingredients into the peanut butter mixture, stirring gently until just combined. Overmixing can make the bars tough, so keep it light.
- Fold in the mini chocolate chips if using—my son Eli’s favorite part! They melt slightly in the oven and add a sweet surprise in every bite.
- Spread the batter evenly into the prepared pan, smoothing the top with a spatula. The batter will be thick but spreadable.
- Bake for 15-18 minutes, or until the edges are golden and a toothpick inserted in the center comes out with just a few moist crumbs. It’s tempting to overbake, but these bars are best when moist and chewy.
- Let the bars cool completely in the pan on a wire rack before slicing into 12 squares. Cooling helps them set up so they hold together well—something I learned after many trial-and-error sessions in my own kitchen.
- Prep Time: 15 minutes
- Cook Time: 30 minutes
- Category: Main Dish
- Method: Cooking
- Cuisine: International
Keywords: Peanut Butter Lunch Lady Bar, recipe, cooking, food
Steps to Create Your Peanut Butter Lunch Lady Bar
- Preheat your oven to 350°F (175°C) and line an 8×8-inch baking pan with parchment paper, leaving some overhang to lift the bars out easily.
- In a large mixing bowl, combine the peanut butter and honey. Stir together until smooth and well blended. I find this step easiest when the peanut butter is at room temperature, so the mixture blends evenly without lumps.
- Beat in the egg and vanilla extract until fully incorporated. This helps bind the bars and adds a little richness.
- In a separate bowl, whisk together the rolled oats, whole wheat flour, baking soda, and salt. This dry mix is where the texture begins to take shape.
- Gradually fold the dry ingredients into the peanut butter mixture, stirring gently until just combined. Overmixing can make the bars tough, so keep it light.
- Fold in the mini chocolate chips if using—my son Eli’s favorite part! They melt slightly in the oven and add a sweet surprise in every bite.
- Spread the batter evenly into the prepared pan, smoothing the top with a spatula. The batter will be thick but spreadable.
- Bake for 15-18 minutes, or until the edges are golden and a toothpick inserted in the center comes out with just a few moist crumbs. It’s tempting to overbake, but these bars are best when moist and chewy.
- Let the bars cool completely in the pan on a wire rack before slicing into 12 squares. Cooling helps them set up so they hold together well—something I learned after many trial-and-error sessions in my own kitchen.
Tips for Making the Best Peanut Butter Lunch Lady Bar
Over the years, I’ve picked up a few pointers that make these bars shine every time: Learn more: Irresistible Southern Banana Cobbler Recipe You Need to Try
- Room temperature ingredients: Having your peanut butter and egg at room temp ensures a smooth mix and even baking.
- Don’t skip the parchment paper: It makes cleanup easier and helps you remove the bars without crumbling.
- Adjust sweetness to taste: If you prefer less sugar, try reducing the honey by a tablespoon or swapping in a sugar-free syrup.
- Oat texture matters: Rolled oats give a nice chew, but if all you have is quick oats, the texture will be softer and less rustic.
- Freeze extras: These bars freeze beautifully, so I always make a double batch and stash some for busy weeks.
- Customize flavors: Add a pinch of cinnamon or a handful of chopped nuts for extra warmth and crunch, inspired by the kinds of tweaks I made during my college dinner parties.
Serving Suggestions and Pairings
Peanut Butter Lunch Lady Bars are versatile enough to enjoy on their own, but pairing them with simple accompaniments can elevate snack time or even a light breakfast. At home, I love serving these bars alongside a glass of cold milk or a cup of Maya’s favorite herbal tea. For a more substantial treat, they pair wonderfully with fresh fruit like apple slices or banana, which balance the bars’ richness with natural sweetness and freshness.
During one of our family weekend mornings, Eli requested these bars with a dollop of Greek yogurt and a drizzle of honey—a combo that’s both kid-friendly and packed with protein. If you’re packing lunchboxes, I recommend wrapping each bar individually to keep them fresh and mess-free.
Storage and Reheating Tips
One of the reasons this recipe works so well for busy families is how easy it is to store and reheat. Here’s how I keep these bars at their best:
- Room temperature: Store bars in an airtight container for up to 3 days. They stay moist and chewy without drying out.
- Refrigeration: For longer storage, keep in the fridge for up to a week. They firm up nicely but may need a few seconds in the microwave to soften.
- Freezing: Wrap bars individually in plastic wrap or parchment, then place in a freezer-safe bag. Freeze for up to 3 months. Thaw at room temperature or microwave for 15-20 seconds before eating.
When I’m prepping meals for the week, these bars are my go-to freezer-friendly snack—quick, reliable, and satisfying after a long day of juggling family and work.
Frequently Asked Questions
What are the main ingredients for Peanut Butter Lunch Lady Bar?
The main ingredients for Peanut Butter Lunch Lady Bar include the items listed in our ingredients section above. Each ingredient plays a crucial role in achieving the perfect flavor and texture.
How long does it take to make Peanut Butter Lunch Lady Bar?
The total time to make Peanut Butter Lunch Lady Bar includes both preparation and cooking time. Check the recipe card above for exact timing details.
Can I make Peanut Butter Lunch Lady Bar ahead of time?
Yes, Peanut Butter Lunch Lady Bar can often be prepared in advance. Store it properly in an airtight container in the refrigerator and consume within the recommended timeframe.
What can I serve with Peanut Butter Lunch Lady Bar?
Peanut Butter Lunch Lady Bar pairs well with various sides and accompaniments. Consider the serving suggestions mentioned in the recipe for the best dining experience.
Is Peanut Butter Lunch Lady Bar suitable for special diets?
Depending on the ingredients used, Peanut Butter Lunch Lady Bar may be adapted for various dietary needs. Check the ingredients list and consider substitutions as needed for your dietary requirements.
Final Thoughts
Creating these Peanut Butter Lunch Lady Bars reminds me why I started sharing food in the first place: to connect, to comfort, and to create moments that bring people together. From my early kitchen experiments to hosting friends in college, and now cooking for my family with Maya and Eli, this recipe embodies the spirit of simple, dependable cooking that anyone can master. Whether you’re a seasoned home cook or just starting out, these bars offer a sweet, wholesome treat that’s easy to make and even easier to love. So grab your mixing bowl, trust the process, and enjoy every chewy, nutty bite—you’ve got this.