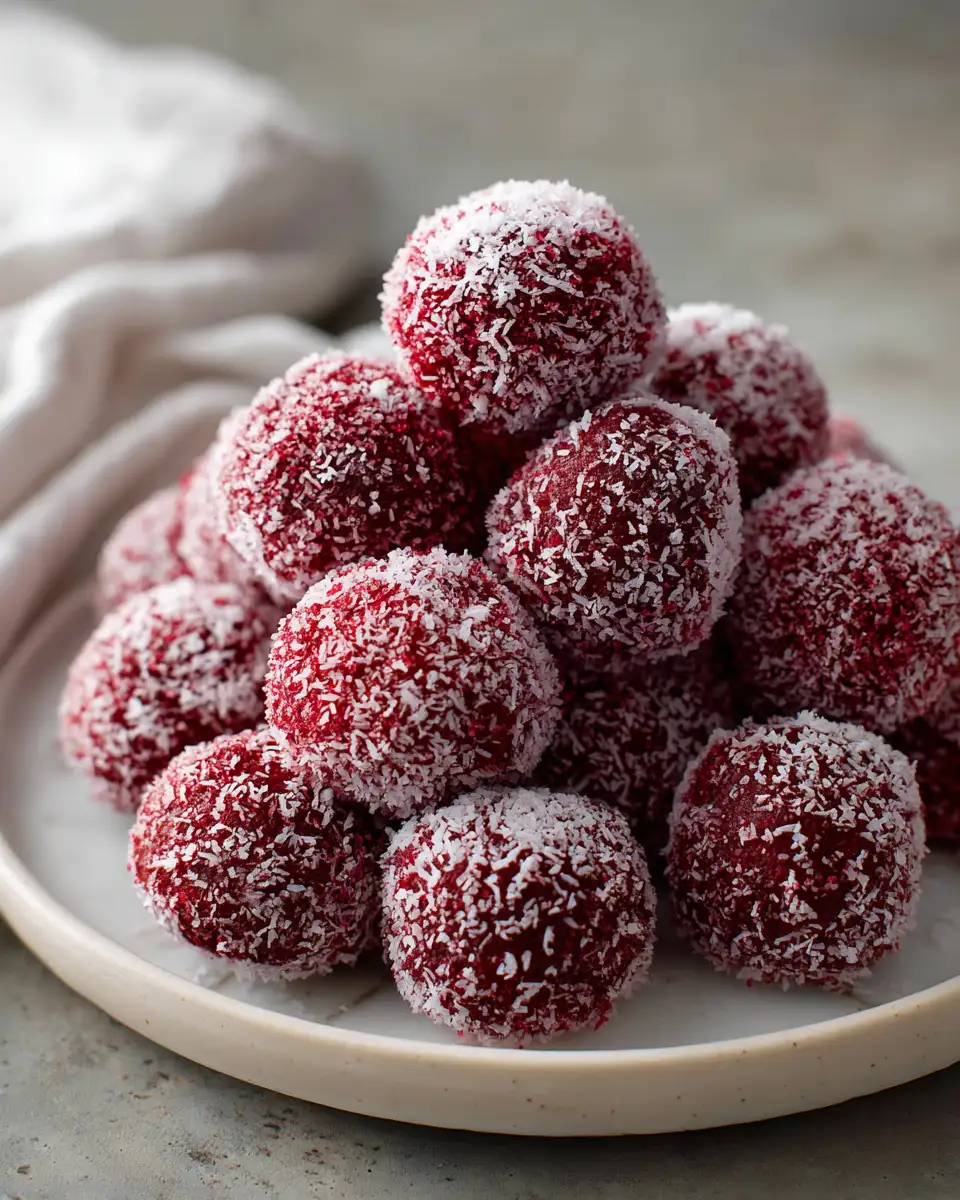
Red Velvet Snowballs might just be my favorite kind of treat to whip up when the mood strikes for something festive yet comforting. Growing up in a modest coastal town, I remember my mom pulling out simple ingredients and turning them into magic that brought our family closer every night. These snowballs are a nod to that spirit—easy to make, budget-friendly, and full of the kind of warmth that turns a simple cookie into a memory. I still recall the first time I tackled a red velvet dessert; it was a bit of a happy accident, much like that oversalted chili I once saved by tinkering late into the night. If you’re looking for a recipe that’s approachable but feels special enough for a holiday or any cozy afternoon, Red Velvet Snowballs are your answer.
Table of Contents
Why You’ll Love This Red Velvet Snowballs
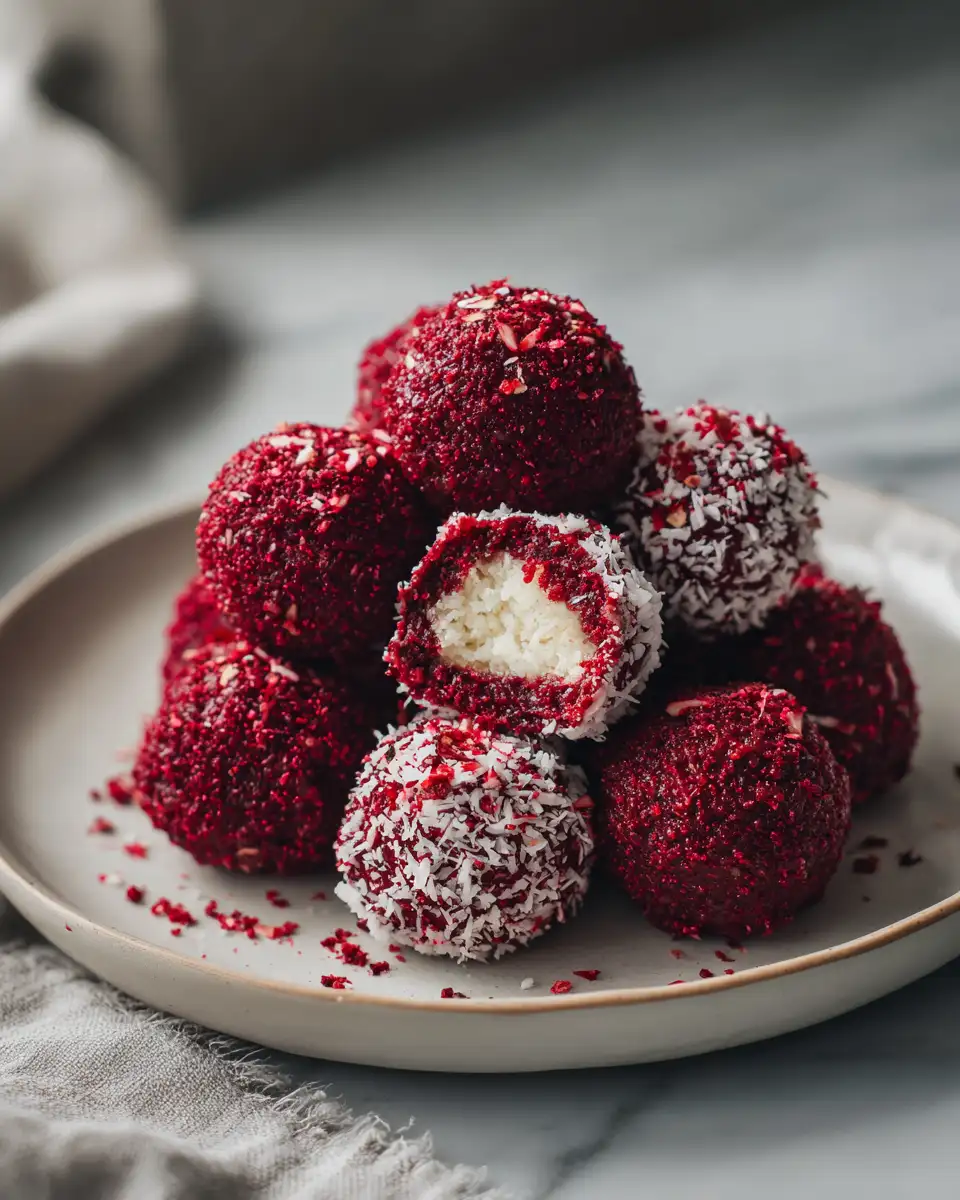
What’s not to love about a cookie that looks like a little snowball but tastes like a celebration? These Red Velvet Snowballs combine the richness of cocoa with the subtle tang of cream cheese, all dusted in powdered sugar for that perfect snowy finish. From my early days of learning to balance flavors after kitchen mishaps, I’ve come to appreciate desserts that aren’t just sweet but have depth and character. These cookies embody that balance.
Plus, they’re forgiving. Whether you’re a beginner like I was at twelve, experimenting after a kitchen flub, or a seasoned home cook trying to impress friends at a Wednesday dinner, these snowballs deliver every time. They’re soft, melt-in-your-mouth tender, and come together with pantry staples. The recipe also lends itself well to tweaks—whether you’re out of buttermilk or want to swap in a plant-based option, I’ve got you covered. And since they freeze beautifully, you can make a batch ahead and have a little joy ready whenever the craving hits.
Ingredients You’ll Need for This Red Velvet Snowballs
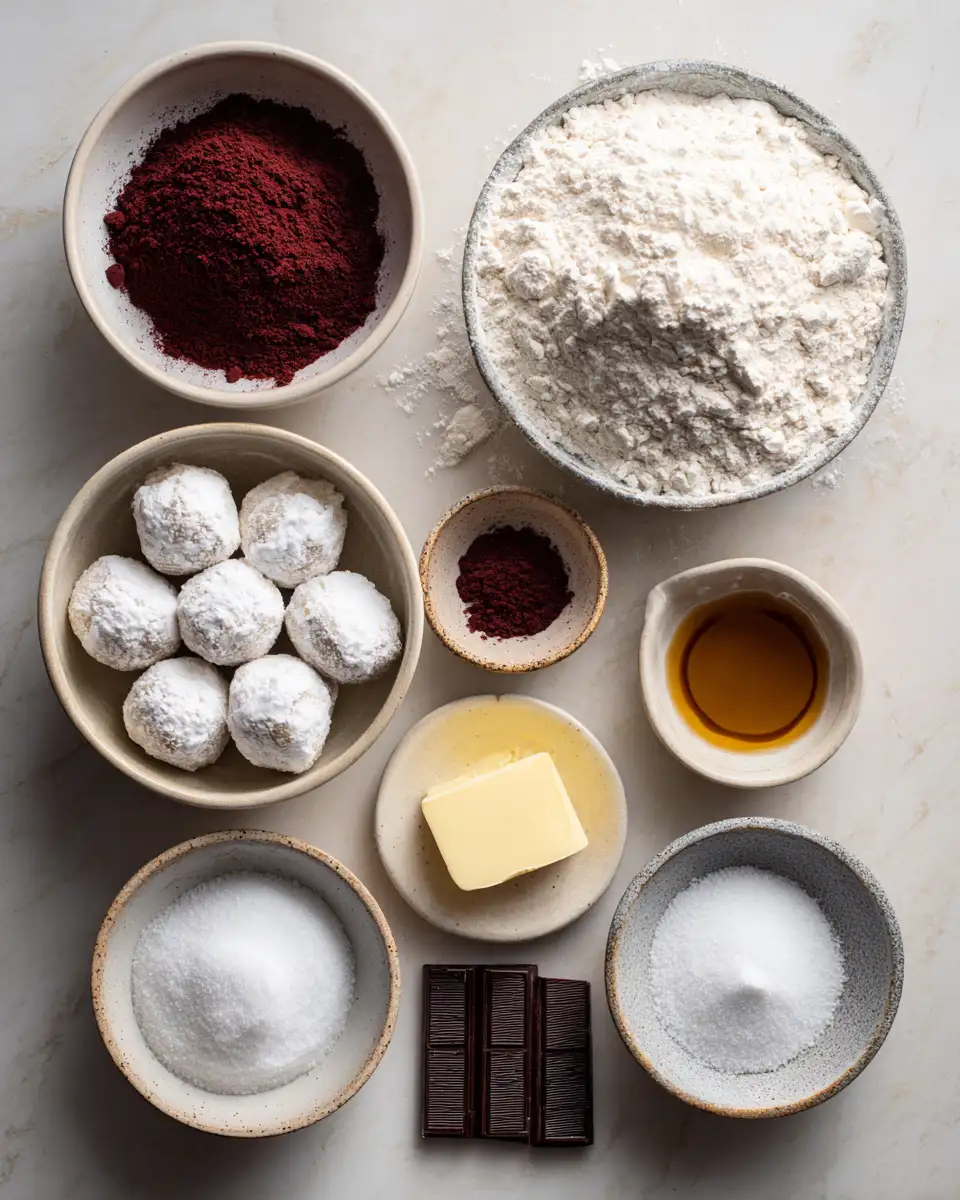
- 1 cup (2 sticks) unsalted butter, softened
- 1 cup granulated sugar
- 1 large egg
- 1 tablespoon vanilla extract
- 1 tablespoon red food coloring (liquid or gel)
- 2 1/2 cups all-purpose flour
- 2 tablespoons unsweetened cocoa powder
- 1 teaspoon baking powder
- 1/2 teaspoon salt
- 1/2 cup buttermilk (see substitution tips below)
- 1 cup powdered sugar, for rolling
Substitution suggestions: If you’re short on buttermilk, no worries—mix 1/2 cup milk with 1/2 tablespoon lemon juice or vinegar and let it sit for 5 minutes before using. For a dairy-free version, use a plant-based milk with the same acid trick. Also, if you prefer to keep these natural, beet juice powder is a great alternative to food coloring.
Nutrition Facts
- Calories: Approximately 180 per cookie
- Protein: 2g
- Fat: 9g
- Carbohydrates: 24g
- Fiber: 1g
- Sugar: 14g
- Sodium: 130mg
These figures are based on a recipe yielding about 24 cookies. Nutrition will vary slightly depending on ingredient brands and portion sizes. When I first started developing recipes for my family, I always kept an eye on balancing indulgence with moderation—a lesson learned from those long evenings making affordable meals that didn’t skimp on satisfaction.
Print
Irresistible Red Velvet Snowballs That Melt in Your Mouth
- Total Time: 45 minutes
- Yield: 4 servings 1x
Description
Learn how to make delicious Red Velvet Snowballs. Easy recipe with step-by-step instructions.
Ingredients
- 1 cup (2 sticks) unsalted butter, softened
- 1 cup granulated sugar
- 1 large egg
- 1 tablespoon vanilla extract
- 1 tablespoon red food coloring (liquid or gel)
- 2 1/2 cups all-purpose flour
- 2 tablespoons unsweetened cocoa powder
- 1 teaspoon baking powder
- 1/2 teaspoon salt
- 1/2 cup buttermilk (see substitution tips below)
- 1 cup powdered sugar, for rolling
Substitution suggestions: If you’re short on buttermilk, no worries—mix 1/2 cup milk with 1/2 tablespoon lemon juice or vinegar and let it sit for 5 minutes before using. For a dairy-free version, use a plant-based milk with the same acid trick. Also, if you prefer to keep these natural, beet juice powder is a great alternative to food coloring.
Instructions
- Preheat your oven to 350°F (175°C). Line two baking sheets with parchment paper to prevent sticking and ensure even baking.
- In a large bowl, cream together the softened butter and granulated sugar using a hand mixer or stand mixer on medium speed. Beat until the mixture is light and fluffy, about 3-4 minutes. This step is crucial for that tender crumb.
- Add the egg, vanilla extract, and red food coloring to the butter-sugar mixture. Mix until fully combined and the batter is a vibrant red.
- In a separate bowl, sift together the all-purpose flour, cocoa powder, baking powder, and salt. Sifting helps avoid lumps and ensures a smoother dough.
- Alternately add the dry ingredients and buttermilk to the wet mixture in three additions, beginning and ending with the dry mix. Stir gently after each addition just until combined—overmixing can make the cookies tough.
- Once the dough comes together, use a small cookie scoop or tablespoon to scoop dough balls. Roll each into a smooth ball about 1 inch in diameter.
- Place the dough balls on the prepared baking sheets, spacing them about 2 inches apart to allow for slight spreading.
- Bake for 12-14 minutes, or until the edges are set but the centers look slightly soft. These cookies will firm up as they cool, so resist the urge to overbake.
- Remove from the oven and let the cookies cool on the pan for 5 minutes. While still warm, gently roll each cookie in powdered sugar to give them that signature snowy look.
- Transfer to a wire rack to cool completely. If you want that extra snowy effect, you can roll them in powdered sugar again once fully cool.
When I first made these with my son Eli, he was fascinated by the transformation—how a simple dough turned into little snowballs that looked like winter on a plate. It’s those small moments in the kitchen that make cooking so rewarding.
- Prep Time: 15 minutes
- Cook Time: 30 minutes
- Category: Main Dish
- Method: Cooking
- Cuisine: International
Keywords: Red Velvet Snowballs, recipe, cooking, food
Steps to Create Your Red Velvet Snowballs
- Preheat your oven to 350°F (175°C). Line two baking sheets with parchment paper to prevent sticking and ensure even baking.
- In a large bowl, cream together the softened butter and granulated sugar using a hand mixer or stand mixer on medium speed. Beat until the mixture is light and fluffy, about 3-4 minutes. This step is crucial for that tender crumb.
- Add the egg, vanilla extract, and red food coloring to the butter-sugar mixture. Mix until fully combined and the batter is a vibrant red.
- In a separate bowl, sift together the all-purpose flour, cocoa powder, baking powder, and salt. Sifting helps avoid lumps and ensures a smoother dough.
- Alternately add the dry ingredients and buttermilk to the wet mixture in three additions, beginning and ending with the dry mix. Stir gently after each addition just until combined—overmixing can make the cookies tough.
- Once the dough comes together, use a small cookie scoop or tablespoon to scoop dough balls. Roll each into a smooth ball about 1 inch in diameter.
- Place the dough balls on the prepared baking sheets, spacing them about 2 inches apart to allow for slight spreading.
- Bake for 12-14 minutes, or until the edges are set but the centers look slightly soft. These cookies will firm up as they cool, so resist the urge to overbake.
- Remove from the oven and let the cookies cool on the pan for 5 minutes. While still warm, gently roll each cookie in powdered sugar to give them that signature snowy look.
- Transfer to a wire rack to cool completely. If you want that extra snowy effect, you can roll them in powdered sugar again once fully cool.
When I first made these with my son Eli, he was fascinated by the transformation—how a simple dough turned into little snowballs that looked like winter on a plate. It’s those small moments in the kitchen that make cooking so rewarding. Learn more: Indulge in the Irresistible Pumpkin Streusel Cheesecake Delight
Tips for Making the Best Red Velvet Snowballs
Here are a few things I’ve learned over the years that make these cookies shine no matter who’s baking:
- Don’t skip softening the butter: It blends better with sugar, creating the texture that leads to tender cookies.
- Measure flour carefully: Too much flour can dry out your cookies. I recommend spooning the flour into your measuring cup and leveling it off rather than scooping directly.
- Use fresh baking powder: This helps the cookies rise nicely and keeps them light.
- Color intensity: Adjust the red food coloring to your liking. I’ve found that gel colors tend to give a richer hue without adding extra liquid.
- Rolling in powdered sugar: Do this while the cookies are warm for better adhesion, then again when cool if you want a heavier dusting.
- Practice patience: Letting the cookies cool fully before serving enhances flavor and texture. I know it’s tempting to dive in right away—I’ve been there—but trust me on this.
“Cooking is a way to connect with family and friends, just like those dinners I grew up with, where every dish told a story.”
Serving Suggestions and Pairings
Red Velvet Snowballs are versatile little treats that can elevate any gathering or quiet afternoon at home. When Maya and I host our weekly dinners, these cookies often steal the show. Here’s how you can serve them:
- Pair with a hot cup of coffee or tea for a cozy afternoon snack.
- Serve alongside a scoop of vanilla ice cream for an easy dessert upgrade.
- Arrange on a festive platter with other holiday cookies for a colorful spread.
- Wrap a few in a cellophane bag tied with ribbon as a thoughtful homemade gift.
At our house, Eli loves dipping them in cold milk, which reminds me of those simple pleasures from my childhood—comfort food that feels like a warm hug. These snowballs aren’t just cookies; they’re moments of joy shared around the table.
Storage and Reheating Tips
One of the things I appreciate most about Red Velvet Snowballs is how well they keep and reheat. Here’s what I do to keep them fresh and ready:
- Room temperature: Store in an airtight container for up to 4 days. The powdered sugar coating may absorb moisture, so rolling again before serving can refresh their look.
- Freezing: Freeze baked and cooled cookies in a single layer on a baking sheet first. Once frozen, transfer to a freezer-safe bag or container. They last up to 3 months this way.
- Thawing: Let frozen cookies thaw at room temperature for about 30 minutes before serving. You can roll them gently in powdered sugar again if needed.
- Reheating: Warm cookies in a 300°F oven for 5 minutes to bring back that fresh-baked softness. This is a trick I learned hosting those Wednesday dinners when I wanted to serve something fresh without starting from scratch.
Frequently Asked Questions
What are the main ingredients for Red Velvet Snowballs?
The main ingredients for Red Velvet Snowballs include the items listed in our ingredients section above. Each ingredient plays a crucial role in achieving the perfect flavor and texture.
How long does it take to make Red Velvet Snowballs?
The total time to make Red Velvet Snowballs includes both preparation and cooking time. Check the recipe card above for exact timing details.
Can I make Red Velvet Snowballs ahead of time?
Yes, Red Velvet Snowballs can often be prepared in advance. Store it properly in an airtight container in the refrigerator and consume within the recommended timeframe.
What can I serve with Red Velvet Snowballs?
Red Velvet Snowballs pairs well with various sides and accompaniments. Consider the serving suggestions mentioned in the recipe for the best dining experience.
Is Red Velvet Snowballs suitable for special diets?
Depending on the ingredients used, Red Velvet Snowballs may be adapted for various dietary needs. Check the ingredients list and consider substitutions as needed for your dietary requirements.
Final Thoughts
Red Velvet Snowballs represent everything I love about home cooking: simple ingredients, a little creativity, and the chance to bring people together. From the lessons learned fixing that oversalted chili as a kid to the cozy family moments around our kitchen table today, creating recipes like this is about more than just food—it’s about connection.
Whether you’re baking for your family, friends, or just because, these cookies offer a sweet, tender bite of nostalgia with a modern twist. They’re forgiving for beginners, adaptable for busy weeknights, and special enough for celebrations. So, roll up your sleeves, gather those ingredients, and know that with every batch of Red Velvet Snowballs, you’re crafting more than cookies—you’re making memories.
